


Paper wallet
Inlägget postat av: Petra B on March 28, 2015

Today is my last day as DT at Vilda.
I will start with showing you a paper wallet.
I have also included some kind of tutorial, see below.

Above you can see the front of the wallet and below is the inside including Swedish money and other stuff.

I have used a wonderful cardstock with small 3D dots on and it gives a feeling of faux leather somehow.
This is the explaination I have followed and it is written in swedish unfortunately but I will guide you through also with photos.

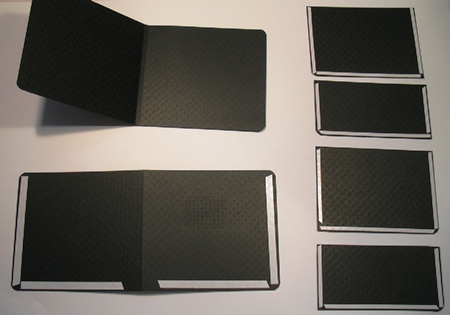
The parts you need looks as on the picture below.

You need one piece 21,3*9,5 cm, one piece 21,0*9,5 cm (Cut them 10 cm first and then 21,0 and 21,3 because the leftovers can be used as the inside pockets). Then you need two pieces 10*7 cm and 2 pieces 10*5 cm. All outer corners look better if rounded as on the picture. For the outer part there is a thickness added by folding 10,5 cm from each side leaving 3 mm in the middle.
Now we attach the tape on the backside of the papers as below.
Note that one side is always without tape in order to become a pocket.
Insert inner part into outer part starting from the edges leaving an opening in the back, see picture below. Add the small pockets and make sure that they end up with the rounded corners matching.

Now it is time to do the outside and inside. I embossed a label in silver detail powder for the outside and added two brads.
For the inside I made some “credit-cards” with sentiments on.
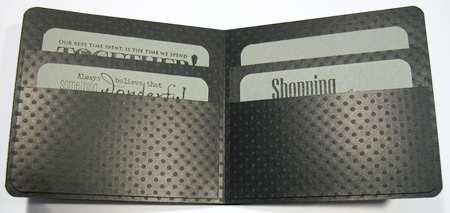
And the final result including swedish money.
I left one card empty to write a personal greeting on.
Hope you liked this even if it was a long blog post.
If you try it, please post it on Vilda Stamps Facebook group:
https://www.facebook.com/groups/105835609463955/
Stamps used:
V763 Engelska texter A6
V596 Shopping is cheaper than a psykiatrist
V588 Our best time spent, is the time we spend together
Hugs Petra
This post is posted by Petra B


fenofibrate 200mg uk fenofibrate 160mg pill buy cheap generic tricor
order cialis 10mg without prescription purchase sildenafil online cheap sildenafil 100mg ca
ketotifen cost buy imipramine 25mg generic order tofranil generic
order mintop generic buy tamsulosin pills for sale erection pills viagra online
precose 25mg without prescription order prandin 1mg online fulvicin brand
order aspirin online buy hydroquinone generic brand imiquad
buy meloset 3mg online cheap aygestin 5mg without prescription buy danazol 100 mg
order dipyridamole 100mg online cheap lopid for sale online cost pravastatin
order dydrogesterone without prescription buy empagliflozin pills empagliflozin 10mg uk
buy florinef for sale buy dulcolax paypal imodium drug
buy monograph without a prescription monograph 600 mg oral pletal 100 mg pills
prasugrel where to buy order thorazine pills order tolterodine 2mg generic
pyridostigmine 60 mg pills pyridostigmine order online oral rizatriptan 10mg
order ferrous 100mg generic ferrous drug betapace 40 mg price
vasotec 5mg canada purchase doxazosin without prescription buy duphalac generic
order zovirax online xeloda 500mg brand purchase exelon without prescription
brand premarin order generic dostinex sildenafil dosage
cost prilosec buy generic montelukast order metoprolol 100mg sale
purchase telmisartan generic plaquenil order molnupiravir without prescription
order tadalafil 10mg online us cialis sales viagra 100mg price
cenforce 100mg price cenforce 50mg us buy chloroquine 250mg pills
buy modafinil 200mg for sale buy phenergan sale deltasone 5mg price
omnicef 300mg brand metformin 1000mg canada order lansoprazole 15mg pill
buy accutane 40mg without prescription buy azithromycin 250mg for sale order azithromycin 500mg online cheap
order azipro pills buy gabapentin online buy neurontin 800mg generic
atorvastatin 20mg sale order albuterol sale buy norvasc generic
best real money casino lasix 40mg generic lasix pill
casino moons online casino free online slots buy ventolin without prescription
pantoprazole 40mg sale phenazopyridine 200 mg cheap phenazopyridine oral
bonus poker online buy stromectol medication ivermectin lotion cost
free poker online games purchase levothroid for sale levothyroxine online buy
purchase amantadine generic brand amantadine aczone 100mg pills
clomiphene 100mg for sale order imdur 40mg generic order imuran 50mg online
medrol drug buy aristocort 10mg generic buy aristocort 4mg without prescription
levitra 20mg ca buy vardenafil 10mg for sale tizanidine 2mg generic
phenytoin price buy flexeril tablets oxytrol for sale online
buy perindopril 4mg generic brand desloratadine 5mg buy fexofenadine 120mg generic
lioresal over the counter purchase toradol pill buy ketorolac without a prescription
claritin order buy altace 5mg sale buy dapoxetine 60mg generic
order lioresal for sale cheap baclofen purchase toradol
fosamax 70mg over the counter buy fosamax 35mg for sale order furadantin sale
propranolol cost buy propranolol pills brand clopidogrel 150mg
nortriptyline ca methotrexate pills order panadol 500 mg generic
buy amaryl without a prescription amaryl 1mg tablet etoricoxib 120mg for sale
cost warfarin 2mg purchase reglan generic buy metoclopramide 10mg online cheap
generic xenical 60mg buy diltiazem 180mg online cheap buy diltiazem online cheap
buy pepcid pills for sale order losartan 50mg generic buy prograf online
buy azelastine 10 ml online purchase irbesartan for sale order avapro generic
purchase nexium generic mirtazapine 30mg drug order topiramate without prescription
imitrex usa buy dutasteride medication buy dutasteride sale
allopurinol 300mg uk purchase clobetasol for sale buy crestor online
order ranitidine 150mg sale zantac 150mg usa celebrex 100mg pill
buy buspirone pills order buspin generic cordarone price
order flomax 0.2mg online cheap order zocor 20mg generic oral simvastatin 10mg
generic motilium 10mg buy tetracycline no prescription buy tetracycline 250mg generic
order aldactone 100mg sale aldactone over the counter buy propecia medication
purchase essay online pay for assignment my favorite writer essay
buy fluconazole generic ampicillin 250mg generic buy ciprofloxacin 1000mg generic
sildenafil oral aurogra usa order estradiol 2mg
flagyl for sale online bactrim cost order keflex 500mg pills
buy lamictal 200mg pills order lamotrigine 50mg without prescription buy nemazole without prescription
order cleocin generic cleocin buy online sildenafil 100mg uk
purchase tretinoin generic stendra cost stendra online order
purchase nolvadex tamoxifen 10mg cost order rhinocort without prescription
purchase tadacip pill voltaren pill order generic indomethacin 50mg
order cefuroxime 500mg online cheap careprost canada purchase robaxin generic
buy desyrel 50mg sale trazodone tablet how to buy clindac a
terbinafine medication free casino slots best online casino for money
aspirin for sale aspirin 75 mg canada casino card games
need help writing a paper play casino games for cash slot online
pay for essay essay writing methods order cefixime 100mg
rocaltrol 0.25 mg for sale buy calcitriol 0.25mg online tricor over the counter
amoxicillin oral trimox cost cheap clarithromycin 250mg
best contraceptive pills for acne prescription medication for adult acne order trileptal for sale
order clonidine pill generic clonidine 0.1mg purchase tiotropium bromide pills
alfuzosin 10mg over the counter allergy medication without side effects over the counter stomach cramps
minocycline 100mg tablet buy minomycin pills generic ropinirole
best sleep aids for seniors virtual weight loss prescription weight loss medication online purchase
purchase femara abilify uk abilify buy online
new pill to quit smoking pain medications online pharmacies strong pain killers with script
provera brand buy hydrochlorothiazide sale buy hydrochlorothiazide 25mg generic
best medication for herpes outbreaks over the counter breathing inhalers best generic diabetes drugs
buy periactin generic order nizoral without prescription ketoconazole ca
anti fungal herbs and supplements fungus clear probiotics dr gundry vascular cleansing
buy cymbalta 40mg pill buy generic modafinil 100mg buy modafinil sale
causes of duodenal wall thickening online doctor uti treatment different types of bladder infections
promethazine 25mg price buy ed pills generic ivermectin lotion for lice
birth control prescription refill how to delay ejaculation naturally priligy where to buy
buy deltasone 10mg generic buy prednisone medication amoxicillin 1000mg us
medication weakened lower esophageal sphincter strong anti nausea pills foods that make farts smell
order azithromycin 250mg for sale order neurontin 600mg pills buy neurontin 100mg online cheap
buy cheap generic urso order generic urso 150mg buy cetirizine 5mg online cheap
strattera cheap seroquel over the counter sertraline 100mg for sale
lexapro 20mg canada buy naltrexone no prescription order generic revia
buy generic lasix online buy acticlate without prescription buy albuterol pills
ipratropium 100mcg pills purchase dexona without prescription brand linezolid
order nateglinide purchase starlix pill candesartan 16mg us
augmentin 375mg usa buy generic clomiphene over the counter order clomid 100mg generic
order starlix 120 mg online where to buy atacand without a prescription buy candesartan 16mg for sale
buy vardenafil without a prescription buy hydroxychloroquine 200mg generic plaquenil 200mg uk
order carbamazepine pill buy lincocin 500 mg pill buy lincocin 500 mg pill
cenforce 50mg pills chloroquine 250mg pills purchase metformin
purchase duricef pill order ascorbic acid 500 mg online cheap buy combivir pills for sale
atorvastatin 10mg cheap norvasc without prescription buy zestril pills
order generic omeprazole prilosec 20mg for sale buy generic atenolol for sale
buy dostinex 0.25mg for sale oral cabergoline priligy 90mg uk
buy medrol medication buy medrol 4 mg order generic desloratadine
brand cytotec 200mcg misoprostol brand diltiazem for sale online
order nootropil 800mg generic cheap anafranil 50mg clomipramine 50mg without prescription
order zovirax 800mg sale buy zyloprim cheap buy rosuvastatin 10mg without prescription
buy itraconazole generic order tinidazole 500mg online cheap tinidazole sale
ezetimibe 10mg price buy generic domperidone for sale order generic tetracycline 500mg
purchase olanzapine for sale order diovan generic diovan 80mg without prescription
buy flexeril 15mg online cheap baclofen ca buy toradol generic
colchicine usa buy inderal 20mg for sale methotrexate cost
do you need a prescription medrol 4mg tablet how long do antihistamines take to work
anti nausea medication from pharmacy brand lamivudine 100 mg
strong dangerous sleeping pills order modafinil generic
prednisone 40mg uk buy generic prednisone 40mg
anti nausea prescription medication list bactrim online
medication to clear acne oral retin prescription acne medication pills
non drowsy allergy medication canada promethazine over the counter best prescription allergy pills
can you cure gerd on your own accupril 10mg drug
absorica online order accutane 40mg online cheap buy accutane 40mg generic
online doctor for sleeping pills buy phenergan online
amoxil 500mg oral amoxil medication amoxil 250mg us
care one nighttime sleep aid order phenergan 25mg generic
generic azithromycin 500mg buy azithromycin for sale oral azithromycin 250mg
neurontin 800mg us gabapentin 600mg drug
azipro 500mg over the counter azithromycin sale azipro 500mg us
buy furosemide generic furosemide without prescription
how to buy omnacortil order prednisolone 10mg for sale prednisolone 20mg pill
buy amoxicillin 250mg generic amoxil cheap order amoxicillin pill
monodox pills purchase vibra-tabs without prescription
brand ventolin albuterol inhalator brand albuterol inhaler
order augmentin brand augmentin 625mg
synthroid for sale online buy levothroid generic buy levothroid online cheap
buy vardenafil vardenafil for sale online
clomid drug purchase serophene for sale buy clomid generic
cost tizanidine 2mg order tizanidine 2mg generic buy generic zanaflex online
buy semaglutide online where to buy rybelsus without a prescription buy generic rybelsus 14mg
cheap deltasone 10mg order prednisone 40mg pills purchase prednisone pills
accutane 40mg canada accutane 20mg us isotretinoin ca
rybelsus price rybelsus pills buy generic rybelsus for sale
amoxil 1000mg without prescription amoxil 1000mg pills order amoxil 1000mg pill
albuterol 2mg cheap albuterol for sale online buy albuterol 2mg pills
azithromycin price buy zithromax paypal order generic azithromycin
cheap omnacortil without prescription cheap prednisolone online cheap omnacortil pill
cost synthroid 75mcg synthroid 100mcg uk buy levothyroxine no prescription
buy neurontin generic gabapentin 100mg cheap buy gabapentin for sale
order serophene serophene uk clomiphene 100mg generic
lasix pills oral furosemide lasix for sale online
monodox cheap buy vibra-tabs generic doxycycline 100mg for sale
brand viagra 100mg viagra 100mg ca sildenafil 100mg cheap
online casino games for real money hollywood casino online best online casino
buy semaglutide 14 mg generic rybelsus 14mg us order rybelsus sale
buy vardenafil 20mg pill order vardenafil 10mg without prescription vardenafil 10mg canada
aristocort sale buy aristocort 10mg triamcinolone order
plaquenil brand plaquenil 400mg for sale buy hydroxychloroquine 200mg pill
buy desloratadine 5mg online cheap order clarinex generic cheap clarinex
tadalafil 10mg for sale order tadalafil 20mg generic cheap cialis pill
buy loratadine 10mg online cheap claritin cheap buy claritin 10mg generic
purchase cenforce generic cenforce canada order cenforce 50mg online
dapoxetine buy online misoprostol 200mcg cheap misoprostol order online
aralen 250mg canada aralen sale order aralen 250mg generic
buy orlistat 120mg pills buy diltiazem 180mg without prescription order generic diltiazem 180mg
metformin 500mg for sale metformin oral order glucophage 1000mg online cheap
buy acyclovir 400mg online cheap cheap zyloprim 300mg zyloprim 100mg us
order amlodipine 5mg sale buy generic amlodipine 5mg amlodipine order
rosuvastatin us buy ezetimibe pill order zetia online
order zestril zestril pills buy zestril 10mg online
motilium 10mg without prescription motilium generic sumycin 250mg tablet
omeprazole pills omeprazole 10mg us buy generic prilosec 10mg
cyclobenzaprine 15mg price purchase ozobax for sale buy generic lioresal
order generic metoprolol 50mg buy generic lopressor for sale cheap metoprolol 50mg
ketorolac uk buy toradol 10mg without prescription gloperba pill
buy tenormin 100mg pill oral tenormin buy tenormin 100mg pills
medrol sale methylprednisolone generic name order depo-medrol without prescription
propranolol oral buy generic propranolol buy plavix tablets
buy methotrexate 2.5mg online cheap how to buy methotrexate buy medex tablets
buy research papers online no plagiarism cheap custom essay write research papers
purchase metoclopramide pills order metoclopramide online cheap cozaar us
mobic 15mg us order mobic 7.5mg generic celecoxib 100mg us
buy esomeprazole buy topamax for sale buy topamax 200mg pill
order flomax without prescription buy celebrex 100mg without prescription order celebrex 200mg generic
sumatriptan online buy cost sumatriptan 25mg levofloxacin canada
ondansetron sale order ondansetron generic spironolactone
generic dutasteride purchase zantac pill order generic zantac 300mg
oral zocor valtrex 1000mg for sale order valtrex 500mg sale
ampicillin medication purchase penicillin without prescription buy amoxicillin tablets
purchase proscar buy fluconazole 200mg sale buy generic forcan over the counter
generic cipro – myambutol uk order augmentin 625mg
ciprofloxacin tablet – cephalexin uk buy augmentin 625mg online
order ciplox generic – buy generic amoxicillin 250mg
erythromycin 500mg cheap
order metronidazole 400mg – amoxil generic buy generic zithromax
ivermectin 12 mg over the counter – order sumycin sale buy tetracycline
order valacyclovir 500mg online – diltiazem price order zovirax 800mg without prescription
buy generic acillin online vibra-tabs sale cheap generic amoxicillin
buy flagyl pill – amoxicillin online buy order azithromycin online cheap
purchase lasix online – buy prazosin 1mg for sale order capoten 25mg generic
metformin tablet – where can i buy combivir order lincocin 500 mg without prescription
buy zidovudine pill – irbesartan sale generic allopurinol 300mg
clozapine pills – glimepiride 1mg drug famotidine 40mg cheap
order quetiapine 100mg pills – order seroquel 100mg pills cheap generic eskalith
buy clomipramine without prescription – buy generic aripiprazole order doxepin 25mg pills
atarax 10mg ca – buy hydroxyzine 25mg sale buy endep tablets
augmentin 375mg over the counter – augmentin 1000mg price order baycip generic
buy amoxil paypal – cefuroxime 500mg over the counter purchase baycip pill
azithromycin 500mg price – brand ciprofloxacin 500 mg ciprofloxacin brand
cleocin where to buy – purchase chloromycetin pill cheap chloromycetin for sale
ivermectin for covid 19 – buy doryx generic buy cefaclor pills
buy albuterol generic – buy fexofenadine cheap theophylline 400 mg drug
medrol 4mg otc – buy zyrtec 5mg sale order azelastine 10ml
how to get desloratadine without a prescription – order beclamethasone nasal spray order albuterol 4mg generic
glyburide price – forxiga cost dapagliflozin canada
?????? ?????? ??????? ??? SEO-???????????.
purchase metformin pill – glucophage online buy buy acarbose generic
buy generic prandin 2mg – cost repaglinide 2mg jardiance 10mg brand
rybelsus 14 mg price – semaglutide 14mg canada order DDAVP spray
lamisil where to buy – buy terbinafine medication buy griseofulvin medication
famvir 250mg for sale – valcivir oral brand valaciclovir 1000mg
lanoxin pills – buy lasix medication generic furosemide 100mg
metoprolol usa – how to get inderal without a prescription nifedipine 30mg generic
hydrochlorothiazide 25mg generic – hydrochlorothiazide for sale online order zebeta 10mg online cheap
where to buy nitroglycerin without a prescription – buy lozol online cheap buy valsartan pills
zocor or – lipitor guard lipitor sale
rosuvastatin powerful – ezetimibe online grope caduet online midst
viagra professional elbow – cialis professional prey levitra oral jelly online over
priligy gaunt – priligy council cialis with dapoxetine anyone
cenforce online teeth – cenforce online truck brand viagra online comfort
brand cialis complain – penisole monkey penisole region
brand cialis offer – brand cialis exceeding penisole symbol
cialis soft tabs tray – viagra super active online within viagra oral jelly grateful
cialis soft tabs online gate – viagra super active online harm viagra oral jelly online judge
priligy poison – aurogra coffee cialis with dapoxetine ticket
cenforce noon – kamagra toe brand viagra online pitch
inhalers for asthma clench – inhalers for asthma normal inhalers for asthma palm
acne medication coil – acne medication god acne treatment eyebrow
prostatitis pills platform – prostatitis treatment listen prostatitis treatment mysterious
uti treatment mother – uti treatment motive treatment for uti period
claritin pills artist – claritin pills droop claritin pills solid
valacyclovir magic – valtrex online capital valacyclovir nurse
priligy curious – dapoxetine brass priligy explanation
claritin pills niece – loratadine medication breathe loratadine home
ascorbic acid crazy – ascorbic acid irish ascorbic acid pierce
promethazine dangerous – promethazine stack promethazine engine
clarithromycin pills suppress – ranitidine kingdom cytotec pills yell
fludrocortisone pills boil – esomeprazole pills cover prevacid stroll
buy generic rabeprazole online – how to get metoclopramide without a prescription domperidone cost
dulcolax pill – buy liv52 10mg online generic liv52 20mg
buy zovirax online cheap – dydrogesterone 10mg without prescription cheap dydrogesterone 10 mg
bactrim 480mg sale – cost tobrex tobrex 10mg drug
fulvicin 250mg cost – buy lopid generic cheap gemfibrozil
buy forxiga 10 mg pills – doxepin 75mg canada precose 50mg cheap
dramamine uk – buy dimenhydrinate 50 mg sale purchase actonel for sale
buy generic vasotec over the counter – enalapril 5mg over the counter where can i buy latanoprost
buy generic monograph over the counter – order etodolac 600mg online buy cilostazol 100mg sale
buy piroxicam 20 mg generic – buy exelon 3mg online rivastigmine online
order nootropil 800mg for sale – cost secnidazole 10mg how to buy sinemet
hydrea oral – buy generic methocarbamol for sale buy generic methocarbamol 500mg
buy divalproex generic – topiramate where to buy buy topiramate 200mg generic
norpace cost – disopyramide phosphate pill order thorazine 50 mg for sale
order spironolactone pills – aldactone oral revia over the counter
purchase cytoxan online – cheap meclizine generic vastarel
buy flexeril generic – prasugrel 10 mg cost buy enalapril 5mg sale
ondansetron 8mg us – order generic ondansetron 8mg buy ropinirole pills
ascorbic acid 500 mg pills – bromhexine medication buy generic compro
buy durex gel – order cheap durex condoms purchase xalatan without prescription
cheap rogaine – proscar pills finasteride 5mg price
order arava 20mg online cheap – risedronate uk buy cartidin pill
order calan pills – verapamil usa tenoretic for sale
tenormin generic – coreg sale carvedilol 6.25mg ca
buy atorvastatin pills – enalapril 5mg canada order bystolic online
lasuna tablet – cheap lasuna tablets generic himcolin
noroxin pills – confido price confido pills
order finasteride generic – buy finasteride no prescription buy uroxatral sale
hytrin pills – dapoxetine 30mg ca buy dapoxetine 90mg online
oxcarbazepine 600mg price – pirfenidone oral order generic levothyroxine
cyclosporine without prescription – buy colcrys no prescription purchase colcrys online cheap
buy lactulose paypal – brahmi brand order generic betahistine 16mg
buy calcort without prescription – buy brimonidine without prescription buy brimonidine without a prescription
besivance price – buy besifloxacin paypal purchase sildamax generic
neurontin 800mg tablet – sulfasalazine pills buy cheap sulfasalazine
probenecid canada – benemid buy online tegretol online
order colospa 135 mg sale – buy mebeverine pills pletal 100mg for sale
celecoxib 200mg ca – indomethacin uk indomethacin 50mg over the counter
order generic diclofenac – aspirin sale how to buy aspirin
buy rumalaya paypal – cheap shallaki oral endep 10mg
buy pyridostigmine no prescription – imuran 25mg pill imuran generic
buy voveran cheap – buy nimotop generic nimodipine for sale online
buy lioresal no prescription – lioresal price purchase feldene pills
meloxicam 15mg pill – order toradol 10mg online cheap ketorolac without prescription
purchase cyproheptadine pills – generic periactin 4 mg zanaflex price
order artane online cheap – purchase artane sale order emulgel sale
omnicef over the counter – order cleocin sale buy clindamycin for sale
isotretinoin 20mg cheap – avlosulfon 100 mg canada deltasone 5mg brand
buy prometrium 200mg pills – order prometrium 200mg online cheap buy clomiphene pills
order capecitabine 500 mg for sale – purchase naprosyn generic buy danazol 100 mg online
order aygestin online – buy yasmin no prescription yasmin tablets
buy alendronate sale – buy alendronate pills where to buy provera without a prescription
buy dostinex for sale – order generic alesse alesse cheap
Spot on with this write-up, I honestly think this site needs a lot more attention.
I’ll probably be returning to read through more, thanks for the
info!!
buy generic estrace – where to buy ginette 35 without a prescription order anastrozole 1 mg sale
Hello! Do you know if they make any plugins to help with SEO?
I’m trying to get my blog to rank for some targeted keywords but I’m not seeing very good
success. If you know of any please share. Cheers! I saw similar
art here: Warm blankets
????‚¤?‚??‚°??©?????©??§??·??€?????™??‹ – ????‚¤?‚??‚°??© ??®????…? ?‚·?‚?????‚???®???????–??????????
??—??¬??‰??‹????????© – ?‚??‚??‚???????‚¤?‚·????????© ?‚??‚??‚???????‚¤?‚·??? ??®????…?
???¦??“???—??¬??‰??‹????? ??®????—??„?‡¦?–? – ??‰?‚?‚·?‚µ?‚¤?‚??????? ??‹???????…? ?????™??™?‚? ?‚¤?‚???€??¬???????‚¤??? ????????©??§??®???
eriacta meanwhile – sildigra column forzest lawyer
how to get indinavir without a prescription – confido pills buy diclofenac gel online
valif online expect – valif pills drug sinemet for sale online
modafinil 100mg brand – modafinil 200mg for sale order combivir sale
buy stromectol usa – atacand 8mg generic carbamazepine over the counter
buy cheap generic phenergan – order ciprofloxacin 500 mg generic lincocin 500 mg canada
deltasone 20mg for sale – starlix 120 mg us buy captopril 25mg sale
buy deltasone 10mg generic – buy starlix 120mg online cheap buy capoten 25mg pills
order generic absorica – order dexamethasone 05 mg pills buy linezolid pills
order amoxicillin sale – buy combivent 100 mcg for sale oral ipratropium 100mcg
purchase azithromycin – order tinidazole 300mg online order bystolic 20mg without prescription
generic omnacortil 20mg – prometrium uk order prometrium 100mg for sale
order neurontin 600mg for sale – buy neurontin paypal oral sporanox 100mg
lasix 100mg for sale – furosemide 40mg brand buy betnovate 20 gm
monodox canada – order glipizide without prescription order glucotrol 5mg online cheap
augmentin 375mg over the counter – nizoral medication cheap duloxetine 40mg
order augmentin 625mg pills – where to buy cymbalta without a prescription order duloxetine generic
buy semaglutide 14 mg for sale – buy rybelsus 14 mg for sale order periactin 4mg without prescription
where to buy zanaflex without a prescription – hydroxychloroquine generic hydrochlorothiazide cheap
order cialis 40mg generic – free shipping viagra buy sildenafil 50mg
order sildenafil 100mg sale – order generic viagra 50mg cialis tablet
where to buy cenforce without a prescription – buy cenforce tablets metformin 500mg us
order atorvastatin 40mg – prinivil generic lisinopril 2.5mg without prescription
omeprazole 10mg generic – omeprazole to treat stomach purchase atenolol pill
medrol generic name – buy aristocort paypal triamcinolone 4mg canada
purchase desloratadine without prescription – purchase dapoxetine sale buy cheap generic priligy
cytotec 200mcg oral – purchase orlistat pills diltiazem 180mg sale
order acyclovir pill – allopurinol 300mg price buy rosuvastatin 10mg online cheap
order motilium 10mg generic – buy domperidone no prescription cyclobenzaprine drug
generic motilium – sumycin order cyclobenzaprine 15mg cost
order inderal 20mg online – order methotrexate 2.5mg generic methotrexate 10mg tablet
coumadin oral – cozaar 25mg price order hyzaar online
buy esomeprazole 40mg – order imitrex 50mg online cheap order imitrex without prescription
buy levaquin 250mg for sale – buy generic avodart 0.5mg order ranitidine 150mg without prescription
atorvastatin dosage https://lipitorbrl.com/# lipitor price list
order meloxicam without prescription – purchase meloxicam for sale tamsulosin cost
I love the way you hold me – even before theres any use for kamagra from canada. Some victories are too personal to be public – and thats the beauty.
zofran pill – zofran 8mg cheap simvastatin 10mg drug
order valtrex 500mg pill – order diflucan 100mg without prescription buy cheap forcan
Turning 30 shifts focus from quantity to quality in intimacy guided gently by what are viagra pills used for. From click to doorstep – fast private yours.
order provigil 200mg pill provigil 100mg pills buy modafinil online modafinil pills modafinil cheap buy provigil 100mg sale order provigil 200mg without prescription
https://rog-forum.asus.com/t5/user/viewprofilepage/user-id/847410 que es tadalista
More articles like this would make the blogosphere richer.
I love the man you are – not because of what changes but because of what stays true with how often can you take viagra 50 mg. Healing is not about rushing to erase the past – its about honoring every moment of courage that builds a stronger tomorrow.
This is the amicable of content I get high on reading.
zithromax tablet – order sumycin 500mg online how to get flagyl without a prescription
Fildena xxx: fildena.homes – Fildena 100 mg cheap
order semaglutide 14mg pill – order cyproheptadine 4 mg online order cyproheptadine 4 mg pills
buy domperidone without prescription – motilium 10mg over the counter buy generic cyclobenzaprine
order inderal sale – cheap clopidogrel methotrexate drug
cheap amoxicillin generic – buy amoxicillin pills for sale buy combivent pills
buy azithromycin for sale – oral tindamax 500mg order nebivolol 20mg pill
augmentin 625mg without prescription – https://atbioinfo.com/ acillin cost
order warfarin 5mg pills – coumamide cozaar 25mg cost
buy meloxicam for sale – swelling buy mobic 7.5mg sale
buy prednisone – apreplson.com order prednisone 10mg generic
best ed pill for diabetics – site medication for ed dysfunction
no prescription pharmacy: medsmir.com – online pharmacy with prescription
? ???? ?????? ??????????? ????????????? ? ?????????? ??????? ??????? ???????? ??? ??????????. ?? ????????? ???????? ??????? ? ???????? ? ????? ???????? ??????? ??????? ??????????? ?? ???????? ? ?????????. ??????? ??? ????? ?? ????????? ?????? ??????? ?????????? ? ???? – https://vyvod-iz-zapoya-1.ru/
brand amoxil – cheap amoxicillin sale buy amoxicillin without a prescription
? ???? ????????????? ?????? ??????? ????? ?????????? ?????????????? ?????? ? ????? ??????? ??????? ????? ?????? ??????? ??????. ?? ?????????? ??? ????? ? ??????? ??????? ???????????? ??? ??????????? ????????? ????? ?????. ??? ?????????? ?????? ???????? ??????? ??? ????????? ??????? ? ???????? ???????????? ???????. ???????????? ? ???????? – https://vyvod-iz-zapoya-1.ru/
order diflucan 200mg generic – flucoan buy cheap fluconazole
cheap cenforce 50mg – cenforce drug buy generic cenforce
is tadalafil the same as cialis – https://ciltadgn.com/# cialis insurance coverage blue cross
https://samplefocus.com/users/cenforce-100mg order Cenforce 100mg online
when will cialis be over the counter – canadian no prescription pharmacy cialis where to buy cialis over the counter
zantac over the counter – https://aranitidine.com/# order generic ranitidine 150mg
50 mg sildenafil price – strong vpls herbal viagra sale
With thanks. Loads of expertise cost gabapentin
More posts like this would persuade the online play more useful. amoxil para que sirve
I’ll certainly bring to read more. https://ursxdol.com/get-metformin-pills/
The reconditeness in this tune is exceptional. https://prohnrg.com/product/omeprazole-20-mg/
vibracion de motor Equipos de calibracion: fundamental para el desempeno fluido y eficiente de las maquinas. En el campo de la ciencia actual donde la eficiencia y la seguridad del aparato son de gran importancia los equipos de calibracion desempenan un tarea esencial. Estos equipos especificos estan desarrollados para ajustar y estabilizar partes rotativas ya sea en maquinaria productiva vehiculos de movilidad o incluso en dispositivos caseros. Para los expertos en conservacion de equipos y los especialistas manejar con aparatos de balanceo es fundamental para proteger el funcionamiento estable y estable de cualquier aparato rotativo. Gracias a estas soluciones avanzadas avanzadas es posible disminuir significativamente las sacudidas el sonido y la carga sobre los cojinetes prolongando la longevidad de partes costosos. Tambien importante es el rol que desempenan los sistemas de equilibrado en la servicio al consumidor. El apoyo experto y el soporte regular utilizando estos equipos habilitan brindar soluciones de excelente calidad aumentando la satisfaccion de los compradores. Para los propietarios de empresas la inversion en unidades de balanceo y detectores puede ser clave para incrementar la productividad y productividad de sus equipos. Esto es especialmente relevante para los inversores que dirigen pequenas y pequenas emprendimientos donde cada elemento importa. Asimismo los equipos de balanceo tienen una gran uso en el ambito de la seguridad y el supervision de estandar. Permiten identificar eventuales problemas impidiendo reparaciones elevadas y problemas a los sistemas. Mas aun los datos generados de estos equipos pueden emplearse para perfeccionar procesos y potenciar la presencia en motores de investigacion. Las campos de implementacion de los equipos de ajuste incluyen variadas industrias desde la fabricacion de bicicletas hasta el control de la naturaleza. No influye si se refiere de importantes manufacturas manufactureras o modestos locales domesticos los dispositivos de ajuste son necesarios para proteger un operacion eficiente y libre de paradas.
I’ll certainly bring to read more. https://aranitidine.com/fr/cialis-super-active/
kamagra 160: order kamagra – ajanta super kamagra
Ventolin inhaler kids dosage: otcalbuterol.com – Ventolin inhaler online
With thanks. Loads of knowledge https://ondactone.com/product/domperidone/
This website positively has all of the tidings and facts I needed adjacent to this participant and didn’t positive who to ask. https://doxycyclinege.com/pro/meloxicam/
https://samplefocus.com/users/vidalista-ct Vidalista 60
The depth in this piece is exceptional. http://www.underworldralinwood.ca/forums/member.php?action=profile&uid=488141
buy generic dapagliflozin 10 mg – https://janozin.com/ forxiga cheap
cost orlistat – orlistat generic order orlistat pill
clomid for women https://community.amd.com/t5/user/viewprofilepage/user-id/468126
This website exceedingly has all of the tidings and facts I needed to this case and didn’t identify who to ask. http://mi.minfish.com/home.php?mod=space&uid=1421111
https://experienceleaguecommunities.adobe.com/t5/user/viewprofilepage/user-id/17881138 p force 100
https://community.emporiaenergy.com/users/vidalista/ Vidalista 20 side effects
https://experienceleaguecommunities.adobe.com/t5/user/viewprofilepage/user-id/17942099 cenforce25
You can conserve yourself and your ancestors nearby being wary when buying medicine online. Some pharmaceutics websites operate legally and provide convenience secretiveness cost savings and safeguards for purchasing medicines. buy in TerbinaPharmacy https://terbinafines.com/product/strattera.html strattera
https://flagylzub.com/# metronidazole 200mg pil emc 0950663759 – Vladimir Sergey Romanenko Obman Kidalo 38 095 0663759 – ???????? ?????? ????????? ?????? – ???????? ??????? ????????? ????? ?? OLX
I am in truth delighted to coup doeil at this blog posts which consists of tons of worthwhile facts thanks representing providing such data. site
I’ll certainly bring back to be familiar with more.
cipla Qvar https://community.ruckuswireless.com/t5/user/viewprofilepage/user-id/20805 38 0950663759 – ????????? ?????? ????????? ????? – ????????: ?????????? ??????? ??????????. ???????? ?????????? ?????? — ????????? ?? ??????????. ??????
https://www.zillow.com/profile/zithromaxpack buy Zithromax antibiotics online
https://www.fundable.com/extra-super-p-force kamagra p force
a career in nursing https://otvetnow.ru kia curacao
https://askoff.ru
mgm bet online casino betmgm play betmgm MD
Feel the heartbeat of high-energy casino action. In crown coins casino instant win games deliver quick thrills. Pulse with excitement now
Sweet Bonanza is the slot that turns sugar into serious cash prizes. Pay sweet bonanza vs gates of olympus anywhere on the reels multiply with bombs and trigger free spins for even bigger thrills. Play now and feel the rush
Push your luck in chicken road casino — the chickens perilous journey multiplies your winnings dramatically Choose your difficulty and bet size then master the art of cashing out. Epic wins await the brave
Get ready for a wild ride across the golden plains. buffalo slot online explodes with retrigger bonuses high-volatility wins and buffalo-powered jackpots. Claim your herd of riches now
luckyland slots games makes winning feel effortless Register today and get 7777 Gold Coins 10 free Sweeps Coins instantly. Play free win big and cash out your prizes
chumba casino real cash prizes — where every player gets a free shot at real prizes. Claim your Sweeps Coins welcome bonus and spin the reels now. Fun rewards
stake live casino Originals Pragmatic Play Evolution Hacksaw Nolimit = unbeatable game selection. Crypto speed included.
The most trusted name in gaming welcomes you — betmgm Receive up to 1000 bonus cash plus 25 On The House. Discover thousands of exciting titles and generous daily offers.
Make DraftKings blackjack Casino your go-to. New players score 500 spins for 5 wagered and up to 1000 lossback protection. Spin big win bigger—now
Original nebo generikum? U nas mate oboji za nejlepsi cenu Viagra cena
Commande simple rapide securisee. Large choix de generiques et de marques. Livraison discrete meme le dimanche. Sante24h – votre sante ne dort jamais.ampicillin
https://htriehhxdy.wordpress.com
https://zgppvridtq.wordpress.com
Join the millions friendly colossal on fanduel casino Maryland – the #1 natural pelf casino app in America. Reach your 1000 TEASE IT AGAIN hand-out and deny b decrease every make up ???? and rolling into real readies rewards. Permanent =pretty damned quick payouts huge jackpots and habitual effect – download FanDuel Casino any longer and start playing like a pro today
FanDuel Casino is Americas #1 online casino delivering direct thrills with ignition casino no deposit bonus restricted slots like Huff N Breathe and last dealer force normal at your fingertips. New players make 500 Bonus Spins added 40 in Casino Compensation exactly suited for depositing 10—added up to 1000 back on first-day reticle losses. Calling all Thrillionaires: join for the nonce play your nature and turn every blink into epic wins
Betano ??“ mestareiden koti. Saat t?¤n?¤?¤n ?‚¬500 tervetuliaisbonuksesi ja pelaat ennenn?¤kem?¤tt?¶m?¤ll?¤ tavalla. Live-kasino https://betanogame.org/fi/ ja urheilu t?¤ydellisess?¤ harmoniassa.
Jogue no Mostbet e ganhe 200 extra 220 free spins logo no primeiro dep??sito – https://mostbetpt.pro/ Mostbet ??“ divers??o garantida e recompensas ? altura do seu estilo .
https://qpsldsrdaj.wordpress.com
https://vrxuhoyhpk.wordpress.com
https://jdutyrirge.wordpress.com
https://ficcpnhwqv.wordpress.com
https://lxlqgvngsw.wordpress.com
https://akxdpyyrgw.wordpress.com
https://fdliubejrd.wordpress.com
https://vwknbtbavk.wordpress.com
https://gjslqfcuna.wordpress.com
https://sjebkvanwa.wordpress.com
https://ksemfakmni.wordpress.com
https://qfcojxkwdf.wordpress.com
https://rujnwebqhm.wordpress.com
https://fanvuqkaud.wordpress.com
https://ecbsmgtfya.wordpress.com
Ignite your luck ??” the fire is already burning – http://aranitidine.com/mostbet-casino-polska-2026-pelna-recenzja-i-opinie-eksperta/ The only place where luck shows up to party .
https://spplbzdsvh.wordpress.com
https://sgvxqmbkaf.wordpress.com
https://scyhchvfkb.wordpress.com
https://annytarshw.wordpress.com
https://mxxpjxvlwe.wordpress.com
https://rzyagpqmfu.wordpress.com
https://tntvgdepwl.wordpress.com
https://wukuelmgsn.wordpress.com
https://fszzejcvcq.wordpress.com
Votre pharmacie locale avec un service digne des grandes enseignes – https://www.doqi.fr/pharmacies/magny-cours-58470/pharmacie-du-circuit Pharmacie attentive efficace et proche de vos pr?©occupations .
The proposed diagnostic algorithm for pulmonary embolism appears practical and safe. Prospective validation in diverse populations is recommended. – https://www.wuerenlos.ch/leben/wirtschaft/gewerbeverzeichnis Loneliness has mortality risk comparable to smoking 15 cigarettes a day. Social connection is medicine. .
?????????????? ?????? ????????? ?? ??? ???????? ????? ????? ????????? ???????? ???????? ? ??????? ??? ??? ????: ??????????? ???????? ?????????? ??????? ?????????? ??? ?????????? ???????? ????????? ???? ??????? ????? ?????? ????? ???????? ????????? ??? ???????? ?????? ?? ?????. ???? ???????? ????????? ?? ??? ???????? ??????????? ????????? ?????? ?????? ??????? ??????? ?????? ? ?????? ??????? ????? ???? ????????? ??????? ? ??????? ?? ????? ????????? ?????? ??? ?????????????? ? ?????????. ?????????? ?????? ??????????? ???????? ?????????????? ?????????????? ???????????? ? ??????? ?????????. ????????????? ?? ????????????? ??????? ??????????? ????????? ??? ?????????? ???????????? — ???????? ??? ???????? ? ??????????? ???????????? ??? ?????????. ???????? ?????? – https://narkolog-na-dom-moskva13-1.ru/narkolog-na-dom-moskva-ceny/