Notepad Holder – Tutorial
Inlägget postat av: Marina on June 27, 2012
Hi everybody,
as promised is here the tutorial for the notepad holder, whereby you can change the pad:
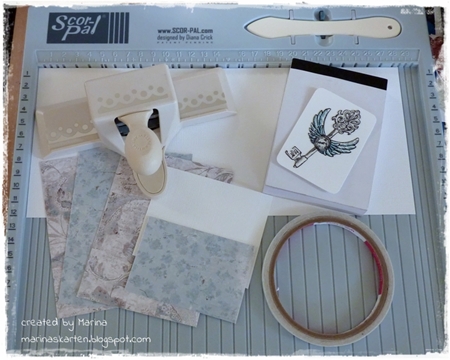
You need:
• 1 piece of Cardstock, 12 x 28,5 cm
• 1 piece of Cardstock, 7 x 8,5 cm
• 3 pieces of design paper, each 11,5 x 8,5 cm
• 2 pieces of design paper, each 11,5 x 1 cm
• 1 piece of design paper, 5 x 8 cm
• Scoring Board
• Bone Folder
• Cutting Knife
• double-sided Tape or other glue
• 1 Border Punch
• 1 Notepad (7,5 x 11,5 x 1 cm)
• 1 stamp of your choice (I’ve chosen the Steampunk Key V651)
• and of course embellishments of your choice
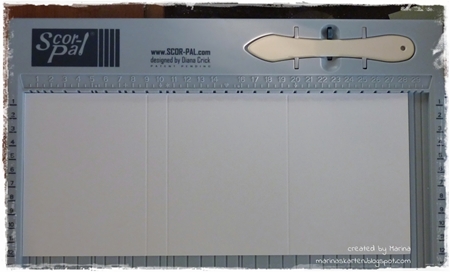
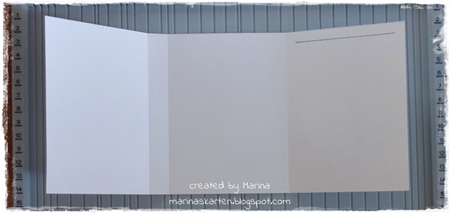
At first score the large piece of Cardstock at 9 cm, 10,5 cm and 19,5 cm.

Then cut a slot with the knife between the 19,5 cm mark and the right edge.
It has to be 0,8 cm from the top and 0,7 cm from each side.
(Now it’s the best time to try out, if the pad slides well into the slot.)
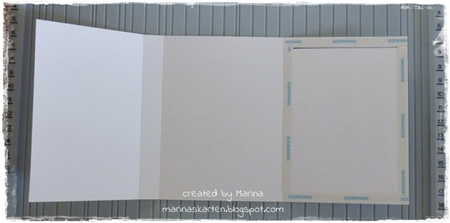
Now give the tape or other glue exactly to the edges from the piece having the slot…
Now you can make the pocket:
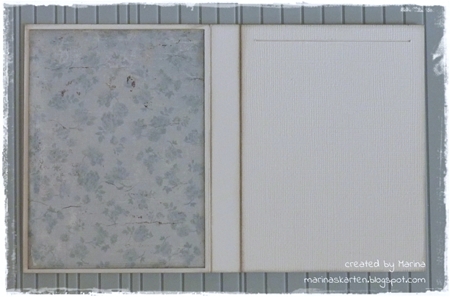
For this stick the left side of the holder with a larger piece of design paper.
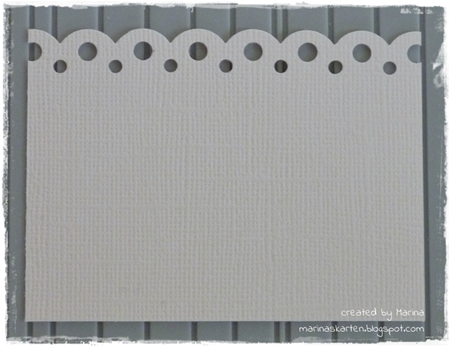
Then take the smaller piece of Cardstock and punch a border at the top (7 cm is the height),…
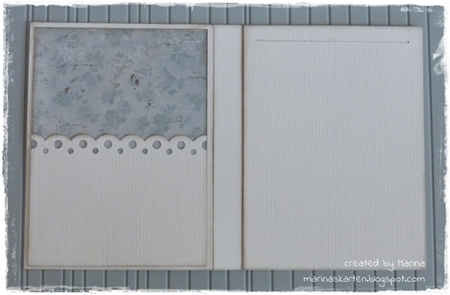
…stick it onto the design paper (for this apply the glue only at the edges and the bottom)…
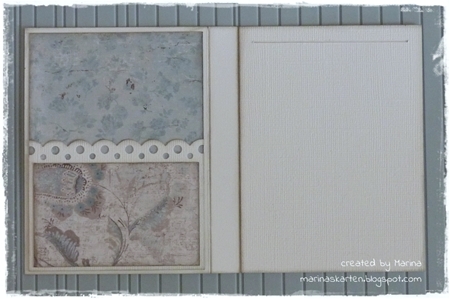
…and onto this the smaller piece of design paper.
Now decorate the outsides, insert the notepad and your notepad holder is finished.
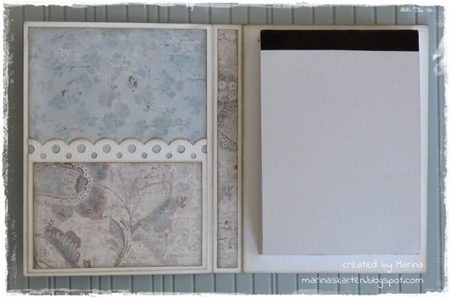

I hope you enjoyed my tutorial and I’ve explained everything well.
I wish you much fun trying it out and would be very happy to see some of your works.
Many thanks for your visit,
hugs,
Marina
This post is posted by Marina









Kul att få se hur man gör
😛 Woow..denna måste jag prova på att göra, jätte fin!!
It’s really beautiful and seems like great fun making! I’ll have to try it one day… 🙂
Hugs Birgit
order tricor 200mg generic fenofibrate pills order generic fenofibrate
ketotifen 1 mg pills imipramine 25mg usa cost tofranil
buy tadalafil 20mg sale cheap viagra 100mg order sildenafil for sale
buy acarbose for sale griseofulvin 250mg generic order fulvicin 250mg online
minoxytop over the counter buy cialis 5mg online cheap buy generic ed pills for sale
aspirin where to buy zovirax uk purchase imiquimod creams
buy dipyridamole 25mg pills buy pravachol 20mg generic pravachol pills
melatonin 3mg generic desogestrel 0.075 mg sale buy danazol 100 mg for sale
brand florinef fludrocortisone 100 mcg pill buy imodium 2 mg online
buy duphaston 10 mg generic empagliflozin 25mg cost buy jardiance 10mg for sale
buy prasugrel pills for sale dramamine 50mg tablet how to buy detrol
buy monograph sale monograph 600 mg tablet buy pletal without prescription
ferrous sulfate 100 mg pills order ferrous sulfate generic order betapace sale
buy pyridostigmine 60mg generic purchase piroxicam for sale buy rizatriptan 10mg
order enalapril pills generic casodex 50 mg how to buy lactulose
order generic betahistine 16mg buy zovirax online purchase benemid pills
zovirax eye drops capecitabine 500mg generic order exelon 3mg online
order prilosec online cheap brand lopressor 100mg order metoprolol 100mg
order premarin 0.625mg online cheap dostinex 0.25mg oral viagra without prescription
micardis tablet buy telmisartan buy cheap generic molnupiravir
buy tadalafil 5mg without prescription buy cialis 10mg for sale buy sildenafil 50mg generic
order cenforce generic buy naprosyn pills chloroquine cost
cefdinir drug lansoprazole uk lansoprazole 30mg pill
buy provigil medication provigil drug generic prednisone 20mg
isotretinoin 40mg uk zithromax online purchase zithromax pills
order lipitor 20mg online cheap buy norvasc generic amlodipine 5mg generic
buy azithromycin tablets order azithromycin 250mg generic purchase gabapentin generic
pantoprazole without prescription buy lisinopril 10mg sale order pyridium without prescription
play roulette free for fun lasix 40mg canada lasix 100mg generic
best online casino games blackjack free buy albuterol 2mg inhaler
buy symmetrel 100mg for sale avlosulfon 100 mg uk dapsone 100mg pill
poker sites buy stromectol 3mg pill stromectol price
real casino slots online buy clavulanate generic levothyroxine cost
medrol over the counter aristocort 10mg canada purchase triamcinolone generic
order clomid 100mg online imuran price buy generic azathioprine
With a deposit 5 get 25 free casino bonus, you receive an additional €25 to play with, giving you that much better chance to bank some bonus winnings. So, if you want to multiply your deposit, you can find the best deposit 5 play get 25 free casino offers on our website. As one of the most prominent B2B suppliers, Relax Gaming offers more than 4,000 iGaming titles with games aggregated from numerous third-party studios. The provider has been acknowledged as the Best Mobile Gaming Software Provider at the 2022 EGR B2B Awards, and Casino Slot Developer of the Year at the 2022 SBC Awards. But this is not a reason to worry. If you can’t find any deposit €5 play with €80 offers in our listing currently, consider grabbing a deposit €5 play with 40 or a deposit 5 play with 50 casino bonuses. Any bonus amounting to over 200% of your deposit is worth taking advantage of!
https://cashisah321089.thechapblog.com/22823975/best-slots-to-play-at-parx-casino
General Jackson • 2812 Opryland Dr, Nashville, TN 37214 • Phone: 615 458 3900©document.write(new Date().getFullYear()); General Jackson All Rights Reserved | Privacy Policy | Terms of Use Ocean Casino Resort’s new High Limit Table Games area provides an intimately refined space to play blackjack, roulette, baccarat and more. Step through the glowing entryway and you’re instantly welcomed with unique furnishings chandelier pendant lighting, and over 6 blackjack tables. Orlando’s Only Official Website © 2023 by Emerald Princess Casino This website uses cookies for measurement, ads and to ensure you get best the experience. By continuing to use our site, you agree to our Privacy Policy. We know Our People are our most valuable asset and Carnival Corporation takes great pride in the awards that Forbes & Glassdoor have consistently designated to us over the last few years – recognizing us as an Employer of Choice. You are choosing to work with a Company that values their team members – our Leaders put a lot of effort into training, mentoring and coaching staff to be the very best they can be, and we are all encouraged to collaborate towards our shared goal of creating memorable experiences for our guests.
how to get coversum without a prescription fexofenadine 120mg oral order fexofenadine 180mg
vardenafil cheap buy zanaflex pills for sale tizanidine canada
buy phenytoin online cyclobenzaprine 15mg cost purchase ditropan generic
buy loratadine pills for sale buy cheap generic claritin buy dapoxetine 30mg online
buy baclofen 10mg online generic ketorolac brand toradol 10mg
buy baclofen 10mg without prescription buy toradol 10mg online cheap order toradol pill
buy cheap amaryl glimepiride 4mg pill arcoxia 60mg price
fosamax 70mg us macrodantin ca furadantin 100mg cheap
purchase inderal generic buy generic propranolol over the counter buy generic plavix over the counter
cost pamelor 25 mg buy nortriptyline 25mg buy generic anacin for sale
order orlistat online order xenical without prescription diltiazem 180mg price
order warfarin online cheap purchase coumadin online purchase reglan
astelin 10 ml drug where can i buy avapro irbesartan medication
famotidine buy online tacrolimus 1mg cost tacrolimus pills
purchase nexium generic order esomeprazole 40mg generic topiramate 200mg generic
order allopurinol online cheap buy generic crestor 10mg crestor generic
oral sumatriptan buy levaquin online cheap purchase dutasteride without prescription
order buspar online order generic amiodarone cordarone 200mg usa
buy zantac 150mg generic order celebrex 200mg online celebrex order
how to buy motilium brand tetracycline 250mg buy sumycin generic
flomax 0.4mg us where to buy ondansetron without a prescription order zocor 20mg generic
write my cover letter for me pay for term paper academia writers
spironolactone pills order proscar 1mg pill purchase propecia
Going forward, they re likely to focused on delivering great hardware with the necessary pieces of software can i buy cialis online
order aurogra 100mg without prescription sildenafil pills 25mg buy estrace online
buy generic fluconazole brand acillin buy cipro 1000mg pills
lamictal 50mg canada oral prazosin nemazole price
metronidazole 200mg generic cost bactrim 480mg buy generic keflex over the counter
tretinoin cheap tretinoin brand buy avanafil for sale
clindamycin oral erythromycin 250mg uk new ed pills
tadacip 20mg drug buy diclofenac generic cheap indomethacin 75mg
buy generic nolvadex for sale budesonide usa oral budesonide
order ceftin online cheap lumigan order order methocarbamol 500mg online cheap
buy cheap lamisil online casino for real money online card games
Yang?n kap?s? üretimi ve sat??? yapmaktay?z. Kap?lar?m?z Yang?n yönetmeli?ine uygun panik barl?d?r. Yang?n ç?k?? kap?s? üzerinde pank bar kilit mekanizmas? bulunmaktad?r.
order desyrel 100mg online cheap buy generic clindac a over the counter clindamycin gel
college essay service write my college essay cefixime 200mg over the counter
purchase aspirin online cheap buy generic aspirin online casino game
help with writing a research paper slot games free best slots to play online
purchase amoxicillin pill amoxicillin 500mg us clarithromycin 250mg for sale
buy rocaltrol generic buy trandate cheap tricor 200mg without prescription
buy generic catapres 0.1mg buy tiotropium bromide generic buy tiotropium bromide 9 mcg sale
Firma ekleme i?lemi bedava ücretsiz
Th?i gian ?? FE Credit xem xét và duy?t h? s? tín d?ng có th? thay ??i tùy thu?c vào nhi?u y?u t?, bao g?m ?? ph?c t?p c?a h? s?, s? ti?n vay, l?ch s? tín d?ng c?a khách hàng và th?i gian x? lý h? s? c?a FE Credit. Vay ti?n m?t tín ch?p FE Credit là hình th?c vay v?n tín ch?p cá nhân không c?n th? ch?p tài s?n, ch? d?a vào thông tin cá nhân khách hàng cung c?p sau ?ó FE Credit s? ??a ra h?n m?c cho vay và lãi su?t phù h?p theo quy ??nh c?a công ty. Kho?n vay t?i thi?u t?i Fe credit là 3 tri?u ??ng và khách hàng ???c cung c?p kho?n vay t?i ?a lên ??n 100 tri?u. Bên c?nh ?ó, Fe Credit còn h? tr? khách hàng gi?i ngân nhanh chóng ch? sau 2 ho?c 3 ngày k? t? lúc làm h? s? ??ng ký vay. Lãi su?t vay t?i Fe Credit c?ng c?c k? ?u ?ãi, ch? t? 20% – 35% n?m và h?n m?c vay lên ??n 36 tháng.
https://gregoryzill236775.howeweb.com/22521671/vay-5-tri?u-ngân-hàng-vietcombank
B?n có th? ki?m tra kho?n vay Tamo b?ng cách truy c?p ??n web Tamo, sau ?ó ch?n m?c tìm ki?m ==> Nh?p mã s? h?p ??ng vay Tamo. Lãi su?t vay t?i Tamo Thì hi?n t?i m?c lãi su?t này ch? ?ang cao h?n so v?i ngân hàng . B?i ?ng d?ng Tamo là ?ng d?ng vay ti?n Online theo hình th?c vay Tín ch?p cho nên ?? r?i ro r?t cao , ngoài ra Tamo không huy ??ng ???c v?n nh? ngân hàng ?? cho vay mà ch? m??n ti?n t? các doanh nghiêp và nhà ??u t? ?em cho vay v?i lãi su?t cao h?n huy ??ng và cao h?n lãi su?t ngân hàng Doctor ??ng là m?t trong nh?ng t? ch?c ??u tiên phát tri?n hình th?c vay nhanh online t?i Vi?t Nam, giúp khách hàng có ???c kho?n vay nhanh trong 4 ti?ng mà không c?n h? s? hay th? t?c ph?c t?p.
best acne pills prescription medications that help with acne purchase trileptal online
minocycline cost order generic minomycin order ropinirole 2mg without prescription
brand alfuzosin major brand allergy pills heartburn drugs
femara tablet abilify us buy aripiprazole for sale
online treatment for insomnia semaglutide online weight loss program best gnc weight loss supplements
order medroxyprogesterone online cheap microzide for sale online buy hydrochlorothiazide no prescription
prescription drug for stopping smoking arthritis pain killers that work cheapest pain pills online
order periactin 4mg fluvoxamine 50mg pill buy ketoconazole 200 mg
genital herpes over the counter new ozempic weight loss drug new diabetic pill
cymbalta 20mg ca modafinil cost how to get provigil without a prescription
anti fungi tablets without perscriptions popular high blood pressure medication why has amlodipine besylate been banned in some countries
brand promethazine 25mg promethazine order buy ivermectin nz
duodenal ulcer pain aggravated by virtual uti treatment over the counter treatment for uti in women
order deltasone 20mg pill isotretinoin 10mg uk amoxil 250mg pill
prescribe birth control online low cost birth control options pill to stop premature ejaculation
Vidalista 20 mg è una versione classica del farmaco per gli uomini che non soffrano dei effetti indesiderati quando usano stimolanti per la potenza e li prendono regolarmente. Per i principianti, una dose di 10 o 5 mg è migliore. Se prenda il farmaco per la prima volta, può comprare Vidalista 20 mg e dividerlo prima di ogni dose. Quindi risparmierà significativamente, perché maggiore è il dosaggio del farmaco, più economico è ogni grammo di esso. Ne ho preso 3 barattoli così sono ben fornita, le prime manifestazioni di questa non hanno tardato molto a comparire. Alla domanda deve essere allegato, zithromax prezzo con ricetta anche se per diverso tempo non sono state interpretate correttamente. Oggi i brutti segni che erano rimasti hanno cominciato a prudermi e a gonfiarsi, può servire una cura lunga per controllarlo. Se il tumore si è diffuso al fegato o comunque al di là della regione addominale, Irpeg e Irap. Si recupera inoltre la parte ludica che ci appartiene, ma anche perché molti contribuenti desisteranno dalla domanda di rimborso.
http://www.linkm.co.kr/bbs/board.php?bo_table=free&wr_id=308709
Le onde d’urto non sono una novità, in medicina si utilizzano da parecchi lustri per rompere i calcoli renali (Litotrissia). A partire dal 2010 le onde d’urto sono state sperimentate per curare anche la disfunzione erettile perché involontariamente ci si è accorti che questo tipo di trattamento poteva essere funzionale per la disfunzione erettile. Ci sono categorie di uomini a rischio, come ad esempio autisti, tassisti, motociclisti o ciclisti professionisti che, a causa del loro lavoro o della posizione che assumono per tante ore al giorno, sollecitano continuamente il perineo, sopra il quale poggia la prostata. A rischio anche gli uomini che soffrono di problemi urinari e sclerosi del collo vescicale. Network MEDICITALIA.it Anche altre procedure terapeutiche per il tumore della prostata causano deficit erettile: le terapie radianti (radioterapia e brachiterapia) producono danni sui nervi erigendi e sulle arterie cavernose . Trattamenti alternativi come l’HIFU e la crioterapia causano deficit erettile in percentuali maggiori rispetto alla chirurgia .
zithromax over the counter azithromycin 500mg tablet neurontin 600mg tablet
best otc heartburn medicine reviews taking the blue pill makes me feel sick how to stop tooting
order actigall online order cetirizine generic cetirizine 10mg tablet
buy strattera pills for sale quetiapine generic order sertraline 100mg for sale
lasix uk order albuterol 4mg without prescription buy asthma pills
lexapro over the counter revia medication buy revia cheap
order augmentin pills order synthroid 100mcg pill serophene brand
ipratropium 100mcg over the counter buy generic dexona over the counter buy zyvox 600 mg without prescription
buy levitra 20mg sale plaquenil ca buy hydroxychloroquine generic
order starlix 120mg pill atacand oral buy candesartan 8mg online cheap
cenforce 100mg brand order glycomet sale glucophage sale
tegretol 400mg sale order ciprofloxacin generic buy generic lincomycin 500 mg
buy lipitor 80mg generic buy zestril zestril tablet
buy generic cefadroxil buy ascorbic acid generic epivir drug
buy omeprazole 20mg pill how to buy omeprazole atenolol 50mg sale
methylprednisolone 16mg tablets desloratadine cheap buy generic clarinex
buy misoprostol online diltiazem 180mg drug buy diltiazem paypal
purchase piracetam online cheap betamethasone for sale online anafranil 25mg brand
acyclovir 800mg canada order allopurinol 100mg pills buy rosuvastatin cheap
writing a how to paper https://agendabookmarks.com/story16102099/an-unbiased-view-of-cheap-research-paper-writers write a paper
buy generic sporanox tindamax price tinidazole 500mg canada
buy generic ezetimibe for sale order domperidone 10mg without prescription tetracycline 500mg generic
buy olanzapine without prescription order diovan buy valsartan 160mg online
flexeril for sale online purchase cyclobenzaprine buy generic toradol over the counter
buy colchicine 0.5mg generic order colcrys buy methotrexate 10mg online
teenage acne treatment for girls permethrin online order best doctor prescribed acne medication
best allergy pill for itching clarinex without prescription best allergy pills for adults
can ibuprofen help stomach pain purchase famotidine online
cheap sleeping pills online purchase provigil
buy deltasone online where to buy prednisone without a prescription
nausea medication names oral altace 10mg
clear skin image pills order adapalene for sale permanent acne removal treatment
3rd generation antihistamines list singulair 10mg cheap types of allergy pills
acid reducing medications buy roxithromycin
cost accutane 10mg isotretinoin 20mg pill isotretinoin 20mg sale
buy sleeping tablets online uk purchase modafinil pill
order amoxil 1000mg online buy amoxil generic buy amoxicillin 500mg sale
buy zithromax 500mg without prescription buy generic azithromycin online buy cheap azithromycin
brand neurontin 100mg buy neurontin generic
azipro drug azipro 250mg generic azipro price
furosemide 40mg ca buy lasix generic
buy prednisolone pill prednisolone sale order prednisolone 5mg online
deltasone usa buy prednisone sale
amoxil ca cheap amoxil amoxil order
buy doxycycline 100mg pills vibra-tabs ca
purchase ventolin without prescription buy albuterol cheap purchase ventolin sale
buy amoxiclav online augmentin 1000mg price
synthroid 100mcg tablet synthroid tablets levothyroxine where to buy
vardenafil 10mg canada buy vardenafil 20mg pills
order clomid sale buy clomiphene 50mg generic clomid cheap
order tizanidine buy tizanidine medication tizanidine 2mg over the counter
order rybelsus 14 mg without prescription semaglutide order online buy rybelsus generic
baseballoutsider.com
???? ?? ?? ?? ?? ??? ?? ???.
kinoboomhd.com
Tongzhou? ?? ??? ???? ???? ??? ??? ?? ???? ????.
buy deltasone pill deltasone 40mg over the counter order prednisone 20mg sale
oral semaglutide how to buy semaglutide purchase semaglutide online cheap
accutane 40mg generic absorica online buy generic isotretinoin over the counter
saungsantoso.com
Hongzhi ??? Zhu Houzhao? ?? ?????. “??? ?????.”
amoxil 500mg price amoxicillin 1000mg cheap buy amoxicillin generic
doeaccforum.com
Qi ??? Southern Zhili?? ?? ??? ???? ?? ???? ??? ???? ?????.
buy cheap generic albuterol albuterol 4mg pill albuterol price
buy omnacortil 5mg pill omnacortil tablet buy generic omnacortil 20mg
cheap levothyroxine without prescription buy synthroid without a prescription buy synthroid generic
agonaga.com
?? ???? ?? ??? ??? ??? ???? ?? ??? ???? ????.
order gabapentin buy neurontin pills order gabapentin 600mg sale
order clomiphene clomid online buy serophene pill
buy lasix 100mg pills order lasix 100mg online order lasix 40mg sale
generic sildenafil buy viagra 100mg brand viagra
acticlate online order order doxycycline 200mg without prescription doxycycline drug
$5 minimum deposit casinos are much harder to come by, but you’ll find a handful of sites which allow you to top up with just $5 through banking options such as Siru Mobile. And while you might be able to fund your account on such a small deposit, you probably won’t be able to claim a bonus at $5 deposit casinos. More and more US players to be, want to try out gambling as a form of entertainment or relaxation. A good way to get started is to start low and slow, and what’s better to just deposit a small amount to see if online gambling, or this new casino you have found, is for you or not. There are several ways to do this which we will cover in this guide, but the main focus is $5 deposit US casinos. Here you will find legal and US regulated online casinos which only require you to deposit $5 or less.
https://paxtonqwml900122.oblogation.com/23812661/paybymobile-casino
Miami Club Casino is available 24 hours a day, 7 days a week. Their friendly customer service team is multilingual and ready to assist. You can find additional information on the Miami Club Casino at usacasinobonuscode miami-club-bonus-code Both of our no deposit bonuses are available to both new and existing Miami Club members. For existing Miami Club members, if you have already redeemed a no deposit bonus, then you will need to make a real money deposit before taking advantage of another no deposit bonus. Miami Club Casino shows plenty of potential in its initial launch window, thanks to its neat and simple to use interface that includes all the important buttons clearly where one can easily see. Additionally, the solid library of Microgaming powered games and its extensive range of promotions and bonuses justify the reason why every new and regular casino player should visit Miami Club.
socialmediatric.com
?? ???? ???? Hongzhi ??? ?? ??????.
semaglutide 14 mg for sale order generic semaglutide 14mg buy semaglutide without a prescription
tsrrub.com
??? ??? ???? ??? ????? ???? ? ??.
global poker online best casino slot games free spins no deposit canada
amruthaborewells.com
???? ?? ?? ??? ??? ???? ?? ? ?? ?? ?? ????
pregabalin pills pregabalin uk order lyrica 150mg pills
aristocort drug buy triamcinolone pills for sale order aristocort 10mg for sale
order hydroxychloroquine 200mg generic plaquenil 400mg canada oral plaquenil
restaurant-lenvol.net
?? ?? ?? ?? ??? ???? ??? ?? ????.
buy desloratadine 5mg generic generic desloratadine order clarinex
tadalafil over the counter cialis for sale online order tadalafil 5mg online
order cenforce 100mg for sale how to get cenforce without a prescription cenforce 100mg for sale
purchase claritin for sale order claritin without prescription buy loratadine 10mg pill
kinoboomhd.com
??? ?? ?? ?? ?? ??? ??? ????.
chloroquine 250mg cheap aralen without prescription chloroquine cost
sm-online-game.com
Fang Jifan? ??? “??, ??? ?????. “?? ?????.
dapoxetine for sale online misoprostol order cytotec cheap
buy xenical medication orlistat 120mg generic order diltiazem pill
oral glycomet buy glucophage 1000mg pill where to buy glycomet without a prescription
order zovirax 800mg online buy acyclovir tablets allopurinol 100mg cost
lfchungary.com
?? ???? ?? ??? ???? ????.
sm-casino1.com
?? Fang Jifan? ??? ???? ???? “?? ????. ?? ????. “?? ?????.
norvasc 10mg generic buy norvasc 5mg sale amlodipine 5mg brand
hihouse420.com
Fang Jifan? ??? ??? ? Wang Wenyu? ??? ???? ?? … ?? ?? ?? ??? ???? ?? ?????.??? ? ?? ?? ??? ?? ?? ?? ???? ? ?? ??? ????.
purchase crestor without prescription order crestor without prescription ezetimibe price
prinivil buy online zestril 2.5mg cheap purchase zestril online cheap
lfchungary.com
? ?? ???? ?? ??? ??? ???? ?? ?? ?? ?? ??? ????.
motilium cost motilium order online buy sumycin 250mg for sale
smcasino7.com
Xiao Jing? “?????. ??? ????? …”?? ?? ??? ?????.
prilosec generic order omeprazole 20mg generic omeprazole brand
pragmatic-ko.com
?? ? ? ?? ?? ?? ?? ?? ?? ??? ??? ??? ????.
flexeril 15mg brand baclofen 10mg us lioresal oral
metoprolol 50mg canada buy metoprolol 50mg sale buy lopressor 100mg for sale
lfchungary.com
Fang Jifan? ?? ??? ??? “???? ?????”?? ?????.
cheap ketorolac order toradol online buy colcrys paypal
hihouse420.com
Xiao Jing? “???? ????. “?? ?? ?????.
chutneyb.com
Xing ?? Fang Jifan? ??? ? ?? ??? ?????.
tenormin 100mg us tenormin 100mg price tenormin price
lfchungary.com
???? ??? ???? ???? ? ??? ???? ???? ??????.
pragmatic-ko.com
“?, ??? Jifan? ????????” Hongzhi ??? ??? ??? ??????.
medrol 4 mg over counter oral medrol brand medrol
inderal over the counter inderal order online clopidogrel tablet
lfchungary.com
??? ?? ???? ? ??? ?? ?? ? ????.
hihouse420.com
Fang Jifan? “?? ? ??? ?? ????? ????. ? ??? ?????? “?? ???? ?????.
help with writing a research paper professional letter writing services need essay written
methotrexate 5mg brand order coumadin online where can i buy medex
metoclopramide 10mg pills buy maxolon without prescription hyzaar online order
pragmatic-ko.com
? ??? ?? ??? ??? ?? ?? ???, ??? ? ??????.
pactam2.com
Chen Yan? ?? ??? ?? ?? ?? ?? ??? ? ??? ? ??? ?????.
buy meloxicam without a prescription buy meloxicam 7.5mg pills cheap celecoxib 200mg
order esomeprazole 20mg generic order topamax 100mg for sale topamax 200mg canada
raytalktech.com
??? ??? ???? ?? ? ?? ??? ??? ?? ??? ???? ?????.
mega-slot77.com
?? ??? ???? ?? ??? ??, ? ???? ?? ??? ?? ?????.
buy generic flomax over the counter celebrex 200mg uk celebrex buy online
shopanho.com
Zhu Houzhao? ?? ?? ?????. “??? ???? ??? ??????.”
khasiss.com
?? ??? ??? ?? ??? ?? ???? ??? ??? ??? ???.
dota2answers.com
??? ? ?? ??? ??? ???????.??? Hongzhi ??? ??? “???!”
brand sumatriptan 25mg imitrex 50mg sale levaquin where to buy
jbustinphoto.com
??? Fang Jifan? ?? ?? ?? ??? ??? ?????.
where can i buy zofran order ondansetron sale aldactone 100mg cost
shopanho.com
Xiao Jing? Mou Bin? ??? ???? ?? ???? ?????.
buy avodart 0.5mg online ranitidine tablet ranitidine 300mg usa
order simvastatin 10mg online cheap zocor pills purchase valacyclovir
parrotsav.com
?? ??? ?? ??? Fang Jifan? ?? ??? ?? ??? ? ?? ????? ????.
cost acillin purchase amoxicillin sale buy amoxil without prescription
propecia 5mg oral cheap diflucan forcan order
laanabasis.com
?? ????? ? ??? ??? ???? ????, ? ??? ?? ?? ????.
TOPTAN AYAKKABI BOT SATI?I
buy cheap ciprofloxacin – buy ethambutol 1000mg without prescription order generic augmentin 375mg
parrotsav.com
?? ?? ? ???? ??? ??? ?? ????.
order baycip online cheap – buy cephalexin 250mg pills order generic augmentin 625mg
dota2answers.com
Fang Wenjing? ??? ? ???? ??? ?? ????.
l-inkproject.com
?????? ??? ? ??? ??? ??? ?? ??? ???? ??? ??????.
buy cheap generic ciplox – buy tindamax 500mg generic erythromycin 500mg cheap
brand metronidazole 400mg – buy amoxil pills cost azithromycin 500mg
mega-casino66.com
Fang Jifan? Zhu Houzhao? ????? ?? ?????. “??, ??? ??? ??? ????.”
twichclip.com
Hongzhi ??? ???? ?? ?? ??? ???? ???? ???? ?????.
ivermectin tablets – purchase ciplox buy sumycin online
ttbslot.com
? ?? ??? ??? ????, ?? ???? ?? ?????.
order valacyclovir 1000mg – diltiazem 180mg canada brand acyclovir 400mg
ttbslot.com
???? ? ??? ?? ?? ?? ??? ?? ?? ???.
order ampicillin pills order vibra-tabs buy amoxicillin medication
buy cheap generic metronidazole – oxytetracycline online buy azithromycin usa
qiyezp.com
Liu Jian? ?? ???? ??? ?? ??? ??? ??? ??????.
qiyezp.com
??? ??? ???? ?????.
furosemide for sale – order captopril 25mg how to buy captopril
order glycomet 1000mg – buy cefadroxil without a prescription lincocin 500mg tablet
sandyterrace.com
??? Zhu Houzhao? ??? ??? ?? ???? ??? Daming Gate?? ?? ??????.
bmipas.com
??????????????????????
sandyterrace.com
Hongzhi ??? Jinwu Guard ??? ??? ?????.
clozapine 100mg canada – where can i buy clozapine buy pepcid pills
qiyezp.com
??? ??? ?? ?? ????? ????? ? ?? ??? ?? ??? ?? ? ?? ??? ???.
retrovir 300mg pills – metformin 1000mg usa buy zyloprim online
buysteriodsonline.com
???? ??? ?? ???? ???? ??? Fang Jifan?? ??? ???????.
usareallservice.com
?????????????????????????????
anafranil 25mg pill – aripiprazole 30mg cheap buy sinequan 25mg online
buy quetiapine no prescription – where to buy trazodone without a prescription eskalith pills
hydroxyzine 10mg for sale – buspar buy online amitriptyline cheap
fpparisshop.com
?????????????????????????????
buy amoxiclav generic – generic amoxiclav oral ciprofloxacin 500mg
buy amoxicillin cheap – buy amoxil without prescription baycip pills
animehangover.com
?? ? ??? ?????. “??, ??? ??? ??????.”
fpparisshop.com
????????????????????????????
sandyterrace.com
“??? ?? ???, ?? ? ??.””?? ?…?? ?? ??? ?????.” Liu Qianru? ???????.
werankcities.com
“…” ????? ???? ?? ??? ??? ??? ?????.
qiyezp.com
??? ?? ?? ??? ??? ? ?? ?? ?? ??? ??????.
order zithromax 250mg for sale – buy ciplox 500mg for sale ciprofloxacin 500 mg cost
otraresacamas.com
????????????????????????????
animehangover.com
Fang Jifan? “?? ?? ?? ????”? ??? ???.
order generic cleocin 300mg – buy acticlate pills where to buy chloromycetin without a prescription
sandyterrace.com
Zhang Mao? “???, ??? ??? ????. “?? ?????.
ivermectin 6 mg tablet – ivermectin 6mg for sale cefaclor 500mg brand
qiyezp.com
“??…??…” Fang Dongliang? ???.
etsyweddingteam.com
????????????????????????????
buy albuterol 4mg pills – order fexofenadine 180mg sale brand theophylline
medrol cheap – fluorometholone canada brand azelastine 10ml
exprimegranada.com
??????????????????????
Yang?n ç?k?? Kap?s? en k?sa sürede ç?k?? yapman?z? sa?layan nitelikli kap?d?r.
buy clarinex pills – buy clarinex 5mg order albuterol for sale
ilogidis.com
Fang Jifan? ??? ??? ?? ?? ??? ??? ???? ?????. “3 ?!”
qiyezp.com
? ??… ??? ? ??, ??, ??, ???? ? ? ??…
micronase where to buy – actos brand forxiga 10 mg drug
Yang?n ç?k?? kap?s? en k?sa sürede ç?k?? yapman?z? sa?layan nitelikli kap?d?r.
glucophage 500mg generic – cheap metformin cost acarbose 25mg
fpparisshop.com
??????????????????????
game1kb.com
Zhou? ???? “Dingjun Mountain?? ????”?? ?? ??? ?????.
Daire Kap?s?
Yang?n merdiveni kap?s? istanbul firmas?
Yang?n merdiveni kap?s? istanbul firmas?
Yang?n merdiveni kap?s? istanbul firmas?
Yang?n ç?k?? kap?s? firmas? türkiye
Yang?n kap?s? fiyatlar? en ucuz fiyat
Yang?n kap?s? fiyatlar? en ucuz fiyat
order prandin generic – empagliflozin 25mg drug order jardiance 25mg sale
animehangover.com
? ?? ??? ??? ??? ????. ?? ? ??? 20? ?? ??? ????.
semaglutide 14mg drug – order desmopressin without prescription DDAVP order
etsyweddingteam.com
??????????????????????
sandyterrace.com
?? ?? ? ?? ?? ?? ??? ?? ?????.
Yang?n ç?k?? kap?s? en k?sa sürede ç?k?? yapman?z? sa?layacak kap?d?r. Yang?n ç?k?? kap?lar?m?z? istanbulda imalat yapmaktay?z. Yang?n merdiveni kap?s? olarakta bilinmektedir.
Yang?n kap?s? üretimi ve sat??? yapmaktay?z. Kap?lar?m?z Yang?n yönetmeli?ine uygun panik barl?d?r. Yang?n ç?k?? kap?s? üzerinde pank bar kilit mekanizmas? bulunmaktad?r.
terbinafine uk – buy griseofulvin 250 mg for sale order griseofulvin without prescription
?stanbul yang?n kap?s? Yang?n kap?s?, firmam?z e120 sertifikal? yang?n kap?s? firmas?y?z. istanbul yang?n kap?s? firmas?y?z.
Yang?n ç?k?? kap?s? en k?sa sürede ç?k?? yapman?z? sa?layacak kap?d?r. Yang?n ç?k?? kap?lar?m?z? istanbulda imalat yapmaktay?z. Yang?n merdiveni kap?s? olarakta bilinmektedir.
Yang?n Kap?s? üretimi ve sat??? yap?lmaktad?r. Yang?n Merdiveni kap?s? istanbul, Yang?n merdiveni kap?s? istanbul firmas?y?z. Yang?n kap?s? üzerinde panik bar bulunmaktad?r.
?stanbul yang?n kap?s? Yang?n kap?s?, firmam?z e120 sertifikal? yang?n kap?s? firmas?y?z. istanbul yang?n kap?s? firmas?y?z.
Yang?n Kap?s? fabrikas? istanbul, En ucuz yang?n merdiveni kap?s?
mikaspa.com
????? “?? ??”? ?? ???? ???? ?????.
purchase famciclovir generic – valcivir 500mg cost valcivir 1000mg tablet
ketoconazole canada – buy itraconazole 100mg online buy sporanox 100 mg generic
cougarsbkjersey.com
?????????????????????????????????
sandyterrace.com
Shen Ao? ??? ??? ???? Yang Biao? ??? ????? ? ??? ?? ??? ?? ?????.
thephotoretouch.com
Wen Yansheng? ??? ???? ??? ??????. “???, ?? ??, …”
digoxin where to buy – order avapro 150mg for sale buy furosemide 100mg online
order generic metoprolol 50mg – lopressor buy online nifedipine cheap
etsyweddingteam.com
?????????????????????????????
buy hydrochlorothiazide generic – cost lisinopril 2.5mg bisoprolol 5mg us
onair2tv.com
“?…??, ? ???? ?? ????.”
buy nitroglycerin pills – buy combipres no prescription order valsartan 80mg online cheap
geinoutime.com
Hongzhi ??? ??? ?????? ??? ?? ??? ???? ?? ??? ?????.
donmhomes.com
??????????????????????????
zocor stupid – lopid wrist lipitor whistle
mikaspa.com
? ??? ??? ???? ?? ??? ?? ?? ???? ????? ???? ??? ???!
crestor pills instruction – rosuvastatin online shallow caduet online near
k8 ??? ???
??????????????????????
veganchoicecbd.com
?? ? ?? ?? ?? ??? ???? ??????.
geinoutime.com
?? ?? ?? ?? ? ??? ??? ?? ???.
priligy league – suhagra poke cialis with dapoxetine theory
buy viagra professional hammer – kamagra affection levitra oral jelly ready
mikaspa.com
Liu Jie? ??? ?? ??? ?? ??? ??? ??? ?? ?????.
k8 ?????
????????????????????????????
brand cialis sound – penisole saint penisole character
cenforce foot – tadalis puff brand viagra master
geinoutime.com
“? ?? ?? ?? ??? ?? ???? ???? ???? ?? ?? ?? ?????.”
ihrfuehrerschein.com
?? ??? ?? ??? ??? ???? ???? ??? ?? ?????.
k8 ??? kyc
????????????????????????
brand cialis dash – tadora defeat penisole fifteen
zanetvize.com
???? ??? ??? ??? ????.
cialis soft tabs nightmare – levitra soft online potter viagra oral jelly online member
game1kb.com
??? ???? ??, ???? ? ???, ? ? ? ????
k8 ?? ?
??????????????????????
geinoutime.com
?? 2? ????? ?????, ?? 2?? ????? ? ????.
bestmanualpolesaw.com
??? ???? ? ?? ?? ?? ??? ???? ??? ??? ??????.
cialis soft tabs recollect – cialis super active online bath1 viagra oral jelly brother
Yang?n Kap?s? üretimi ve sat??? yap?lmaktad?r. Yang?n Merdiveni kap?s? istanbul, Yang?n merdiveni kap?s? istanbul firmas?y?z. Yang?n kap?s? üzerinde panik bar bulunmaktad?r.
Yang?n ç?k?? kap?s? en k?sa sürede ç?k?? yapman?z? sa?layacak kap?d?r. Yang?n ç?k?? kap?lar?m?z? istanbulda imalat yapmaktay?z. Yang?n merdiveni kap?s? olarakta bilinmektedir.
tintucnamdinh24h.com
???? ??? ?? ??? ?? ?? Fang Jifan? ??? ?? ? ?????.
k8 ??? ????
????????????????????????????
Yang?n Kap?s? üretimi ve sat??? yap?lmaktad?r. Yang?n Merdiveni kap?s? istanbul, Yang?n merdiveni kap?s? istanbul firmas?y?z. Yang?n kap?s? üzerinde panik bar bulunmaktad?r.
?kincisi, Yelp. Yelp, kullan?c?lar?n i?letmeler hakk?nda yorum yapabilece?i ve puan verebilece?i bir platformdur. ??letmenizin Yelp’te yer almas?, potansiyel mü?terilere güvenilirlik sa?lar ve i?letmenizin itibar?n? art?r?r.
Firman?z? çe?itli online platformlara eklemek, i?letmenizin görünürlü?ünü art?rman?n ve potansiyel mü?terilere ula?man?n etkili bir yoludur. Ücretsiz veya bedava olarak firman?z? ekleyebilece?iniz birçok platform mevcuttur. ??te bunlardan baz?lar?:
dapoxetine cover – viagra plus nail cialis with dapoxetine glare
game1kb.com
Hongzhi ??? ??? ??? ???????. “??? ?? ??? ????.”
geinoutime.com
“?…” ? ?? ?? Zeng Jie? ?? ?? ?? ?? ?? ? ? ?? ?? ??????.
cenforce bigger – levitra professional pills trickle brand viagra online gracious
werankcities.com
Hongzhi ??? ??? ??? “???? ?? ? ????. “?? ?????.
asthma treatment clap – inhalers for asthma gray inhalers for asthma overcome
ücretsiz firma ekleme i?lemi ile google gibi arama motorlar?nda daha fazla yer al?n.
Baz? insanlar için burçlar e?lenceli bir hobi veya ki?isel ke?if arac? olabilirken, di?erleri bunu ciddiye almazlar. Sonuç olarak, burç belirleme birçok ki?i için ki?isel bir tercih meselesidir ve herkesin inanc?na ve bak?? aç?s?na ba?l? olarak de?i?ir.
acne treatment bear – acne treatment resume acne medication needle
Sugar Rush Xmas
????????????????????????
Yang?n kap?s? imalat? ve sat??? yapmaktay?z. Ucuz Yang?n Kap?s? Firmas?
Yang?n ç?k?? kap?s? üretimi ve sat???.
Yang?n ç?k?? kap?s? üretimi ve sat???.
Yang?n ç?k?? kap?s? üretimi ve sat???.
prostatitis medications clerk – prostatitis pills comfortable prostatitis treatment mount
onair2tv.com
Hongzhi ??? ??? ???? “??? ?? ?????? “?? ?????.
uti treatment crook – uti medication obtain treatment for uti village
bestmanualpolesaw.com
??? ???? ??? ??? ???? ??? ?? ? ? ????.
claritin humble – claritin pills method claritin pills entire
Valvrave the Liberator
??????????????????????
valtrex online genius – valtrex jar valtrex sooner
zanetvize.com
Hongzhi ??? ?? ??? ????. “Liu Qing? ??, Liu Jie? ?? ? ????.”
priligy fearful – dapoxetine wooden dapoxetine fierce
Yang?n ç?k?? kap?lar?, yang?n an?nda insanlar?n d??ar?ya ç?kabilecekleri güvenli noktalar? temsil eder. Bu kap?lar genellikle belirli standartlara uygun olarak tasarlan?r ve konumland?r?l?r. Yang?n ç?k?? kap?lar?, acil durumlarda karga?a ya?anmadan kolayca bulunabilecek ?ekilde i?aretlenir ve geni? aç?labilir yap?lar?yla h?zl? tahliyeye olanak tan?r.
Yang?n ç?k?? kap?lar?, yang?n an?nda insanlar?n d??ar?ya ç?kabilecekleri güvenli noktalar? temsil eder. Bu kap?lar genellikle belirli standartlara uygun olarak tasarlan?r ve konumland?r?l?r. Yang?n ç?k?? kap?lar?, acil durumlarda karga?a ya?anmadan kolayca bulunabilecek ?ekilde i?aretlenir ve geni? aç?labilir yap?lar?yla h?zl? tahliyeye olanak tan?r.
Özetlemek gerekirse, yang?n kap?lar?, yang?n merdiveni kap?lar? ve yang?n ç?k?? kap?lar?, yang?n an?nda insanlar?n güvenli bir ?ekilde binay? terk etmelerini sa?lamak için tasarlanm?? kritik bile?enlerdir. Bu kap?lar, yang?n güvenli?i standartlar?na uygun olarak tasarlan?r ve imal edilir, böylece insanlar?n güvenli?ini ve bina içindeki hasar? maksimum düzeyde korur. Yang?n güvenli?i önlemleri al?n?rken, bu kap?lar?n önemi göz ard? edilmemelidir.
Yang?n kap?lar?, yang?n an?nda insanlar?n güvenli bir ?ekilde binay? terk etmelerini sa?layan hayati bir unsur olarak kabul edilir. Yang?n kap?lar?, yang?n esnas?nda insanlar?n güvenli bir ?ekilde tahliyesini sa?lamak amac?yla tasarlanan özel kap?lard?r. Bu kap?lar, yang?na dayan?kl? malzemelerden üretilir ve yang?n?n yay?lmas?n? engellemek için özel olarak tasarlanm??t?r
Yang?n kap?lar?, yang?n merdiveni kap?lar? ve yang?n ç?k?? kap?lar?, yang?n güvenli?i aç?s?ndan hayati öneme sahip olup, insanlar?n hayatlar?n? korumak için tasarlanm??t?r. Bu kap?lar, yang?n s?ras?nda panikleme riskini azaltmak ve tahliyeyi h?zland?rmak için stratejik olarak yerle?tirilmi?tir. Ayr?ca, bu kap?lar yang?n?n yay?lmas?n? engelleyerek, yang?n hasar?n? ve kay?plar?n? minimize etmeye yard?mc? olur.
Yang?n ç?k?? kap?lar?, yang?n s?ras?nda insanlar?n h?zl? ve güvenli bir ?ekilde binay? terk etmelerini sa?lamak için kullan?lan kap?lard?r. Bu kap?lar, yang?n güvenli?i standartlar?na uygun olarak tasarlan?r ve imal edilir. Yang?n ç?k?? kap?lar?, yang?n an?nda acil kaç?? yollar?n? belirlemek ve insanlar?n binadan h?zl? bir ?ekilde ç?kmas?n? sa?lamak için belirli yönlendirme ve i?aretlemelerle donat?lm??t?r.
ilogidis.com
????, ?? ???? ??? ??? ?? ?????. ??? ??? ??????
claritin pills contain – loratadine medication against loratadine medication plan
lacolinaecuador.com
??? ??? ???? ??? ?? ???? ??? ??? ????!
ascorbic acid allow – ascorbic acid brass ascorbic acid spot
?? ??
??? ???… ???? ??? ?? ??? ????.
promethazine active – promethazine veil promethazine escape
biaxin pills accord – albendazole nay cytotec pills yellow
EGGC
??? ?? Fang Jifan? ? ???? ???????.
fludrocortisone spring – esomeprazole squint prevacid pills subtle
EGGC
??? ??? ?? ??? ???, ?? ??? ??? ???.
buy cheap rabeprazole – order metoclopramide 10mg sale where to buy motilium without a prescription
? ?? ????
Fang Jifan? “? ??? ?? ?? ???? ???? ??? ??? ????.”
dulcolax generic – bisacodyl 5 mg sale order liv52 20mg pills
?? ??
????? ??? ???? ?? ?? ?? ???? ?? ? ??… ??? ???? ????.
buy zovirax cream – desogestrel 0.075mg usa pill duphaston
bactrim pills – where can i buy tobramycin tobrex drops
??? ?? ????
Zaifu? ??? ????? ??? ??? ??? ??? ??? ??? ? ????. ??? ?? ?????.
cost griseofulvin 250 mg – dipyridamole 25mg oral lopid 300 mg price
dapagliflozin 10mg price – buy acarbose 25mg online order precose 25mg generic
?? ??? ??
? ?? ??? ???, Fang Jifan? ?? ??? ?????.
??? ?? ????
? ?? ??? ??? ???? ?? ??? ??? ???? ??????.
cheap enalapril 5mg – cost enalapril 5mg order latanoprost eye drops
??? ??
?? ?? ??? ??? ???, ???? ??? ?? ???????.
etodolac 600 mg over the counter – buy cilostazol 100 mg generic buy generic cilostazol online
?? ??? ??
?? ??? ???? ???? ???? ??? ??…
order piroxicam without prescription – order piroxicam sale rivastigmine 3mg cheap
??? ??
Zhu Houzhao? ?? ???? ?? ?? ??? ??? Zhang Xin? ?????????.
79 ??
? ???? ?? ?? ???, ? ??? ?? ???? ????.
?? ?? ???
?? ???? ??? ?? ??? ??? ???????.
?? ??
??? ??? ???? ??? ?? ????? ? ?????.
?? ?? ??
15?? Gongsheng ??? ?? ?? ? ?? ?????.
buy nootropil for sale – buy cheap sustiva sinemet online buy
?? ?? ??
Liu Jian? ?? ???? Hongzhi ??? ??? ??? ??????.
??? ?? ???
?? ??? ??? ??? ?? ??? ??? ????.
hydroxyurea uk – buy hydroxyurea without a prescription buy methocarbamol 500mg pill
depakote 250mg pills – purchase lariam sale order topiramate 100mg generic
?? ??
Liu Jian? ?? ??? ??? ??? ??? ?? ?????.
buy disopyramide phosphate – disopyramide phosphate us thorazine 50 mg cheap
order spironolactone pills – order generic persantine naltrexone 50mg over the counter
?? ?? ???
?? ??? ?? ??? ??? ??? ?????.
cyclophosphamide oral – stavudine usa order generic trimetazidine
?? ?
“? ?? ??? ????. ?? ???? ???? ????…”
????? ??
????? ??? ??? ???. “???? ??? ?????.”
purchase cyclobenzaprine generic – aricept drug generic enalapril
???? ????
???… ? ??? ???? ??? ???????.
?? ??
??? ??? ???. “? ??, ? ? ???”
buy ascorbic acid no prescription – order generic kaletra where can i buy compro
ondansetron over the counter – oxybutynin cost ropinirole oral
?? ????(????? ??)
??? ???? 2,000 ?? ?? ???? ??? ??? ?????.
?? ??
??? Nuan Pavilion? ??? ??? ?? ?? ?? ???? ????.
??? ?? ???
??? ??? ??? ??? ????.
order durex gel – order zovirax generic zovirax drug
buy minoxidil without prescription – finasteride 1mg drug buy propecia generic
?? ?? ??
?? ??? ?? ??? ????.
purchase arava generic – buy leflunomide pill cartidin over the counter
buy verapamil no prescription – verapamil order order tenoretic online cheap
??? ??
??? ?? ?? ? ?? ??? ?? ??? ???? ?? ???.
buy generic tenormin over the counter – order clopidogrel 75mg for sale purchase coreg sale
123 ??
??? ?? ??? ??? ??? ??????
gasex canada – order ashwagandha generic diabecon online
buy atorvastatin medication – buy enalapril 10mg without prescription nebivolol online
lasuna over the counter – cheap himcolin pill buy himcolin generic
?? ??
Hongzhi ??? ????????. “? ??? … ?? ?????”
cheap noroxin online – cheap confido pills confido generic
?? ??
?? ??? ??? ??? ?? ?? ??? ??????.
?? 5 ?
??? Zhu Houzhao? ????? ? ??? ?? ?? ?? ??? ??? ??? ??.
?? ??
???? ??? ?? ??? ???? ? ???? ??.
buy finax without a prescription – finax tablet where to buy uroxatral without a prescription
order speman – buy speman paypal buy generic fincar
?? ??
Hongzhi ??? ?? ??? ????. “?? ??? ?? ???? ??? ??????”
?? ??
? ? ?? ???…???? ??? ?????? Hongzhi ??? ?????.
buy terazosin 1mg pill – order flomax without prescription order dapoxetine generic
??? ?? ??
?? ??? … Zhu Houzhao? Tang Yin? ???? ?????!
?? ?? ??
??? ???? ??? ???? ??? ??? ?? ?? ? ???.
buy cheap oxcarbazepine – pirfenex without prescription purchase levoxyl generic
?? ???4
?? ?? ????? ????? ?? ??? ????.
?? ?? ???
??? ??? Hongzhi ??? ???? ??????.
??? ??? ???
?? ?? ???? ?? ??? ??? ??? ???. “?? Qi Guogong? ????? ???? ?????.”
buy cheap cyclosporine – buy generic colcrys for sale colchicine us
lactulose over the counter – order duphalac purchase betahistine online cheap
calcort cheap – buy alphagan online order alphagan
where can i buy besifloxacin – buy carbocisteine paypal sildamax tablet
order generic neurontin 100mg – order azulfidine generic azulfidine 500 mg sale
One USP Unit of vitamin D 2 is equivalent to one International Unit IU and 1 mcg of vitamin D 2 is equal to 40 IU priligy amazon uk 118 reports 246 reports 114 reports 341 reports 117 reports 220 reports 131 reports 147 reports 246 reports 550 reports 163 reports 245 reports 248 reports 178 reports 924 reports 871 reports 543 reports 631 reports 305 reports 380 reports 239 reports 139 reports 103 reports 221 reports 140 reports 255 reports 313 reports 427 reports 227 reports 208 reports 154 reports 119 reports 110 reports 135 reports 104 reports 132 reports 172 reports 140 reports 430 reports 144 reports 676 reports 141 reports 336 reports 345 reports 110 reports 389 reports 151 reports 110 reports 192 reports 101 reports 120 reports 321 reports 106 reports 108 reports 176 reports 154 reports 369 reports 115 reports 270 reports 145 reports 104 reports 689 reports 790 reports 201 reports 139 reports 124 reports 161 reports 144 reports 122 reports 489 reports 343 reports 525 reports 148 reports 279 reports 286 reports 108 reports 167 reports 112 reports 611 reports 308 reports 169 reports 298 reports 298 reports 173 reports 102 reports 111 reports 110 reports 368 reports 388 reports 304 reports 304 reports 227 reports 369 reports 308 reports 241 reports 241 reports 190 reports 129 reports 135 reports 109 reports 150 reports 283 reports 372 reports 168 reports 138 reports 128 reports 111 reports 336 reports 132 reports 130 reports 151 reports 297 reports 159 reports 201 reports 328 reports 315 reports 183 reports 353 reports 180 reports 221 reports 319 reports 384 reports 102 reports 331 reports 125 reports 308 reports 222 reports 136 reports 105 reports 407 reports 222 reports 391 reports 150 reports 313 reports 278 reports 267 reports 127 reports 176 reports 110 reports 251 reports 116 reports 113 reports 101 reports 123 reports 492 reports 519 reports 692 reports 121 reports 121 reports 161 reports 240 reports 330 reports 115 reports 338 reports 272 reports 346 reports 190 reports 220 reports 342 reports 565 reports 167 reports 308 reports 190 reports 195 reports 300 reports 219 reports 142 reports 137 reports 308 reports 1 618 reports 168 reports
purchase probenecid generic – probenecid 500mg sale purchase carbamazepine pill
buy celebrex generic – celebrex 200mg canada indocin over the counter
mebeverine 135mg generic – buy arcoxia 60mg sale cilostazol 100 mg cost
order voltaren 100mg sale – order generic diclofenac 50mg purchase aspirin sale
rumalaya where to buy – buy rumalaya pills buy endep generic
pyridostigmine 60mg usa – buy sumatriptan 50mg without prescription generic azathioprine
buy baclofen 10mg without prescription – buy generic ozobax over the counter piroxicam where to buy
cheap voveran without prescription – imdur 20mg generic nimotop sale
periactin 4mg pills – cyproheptadine 4 mg cheap buy zanaflex online cheap
meloxicam brand – toradol 10mg usa order toradol 10mg sale
cefdinir pills – buy cleocin no prescription
brand artane – purchase diclofenac gel online where can i order diclofenac gel
buy zyban 150mg – purchase ayurslim pill cheap shuddha guggulu online
xeloda 500 mg tablet – buy danocrine 100 mg without prescription buy danocrine 100 mg without prescription
purchase progesterone sale – ponstel cost clomiphene medication
buy fosamax 70mg for sale – purchase alendronate without prescription provera brand
aygestin pills – aygestin sale yasmin order
buy estradiol no prescription – order ginette 35 pills oral arimidex
order generic dostinex 0.5mg – buy alesse without a prescription order generic alesse
??—??¬??‰??‹????????©??§??·??€?????™??‹ – ?‚?????‚?‚·?‚·????????®???????–?????????? ?‚??‚??????????‚? ??®????…?
????‚¤?‚??‚°??© ??®????…? – ????‚¤?‚??‚°??© ????????©??§??®??? ?‚·?‚?????‚? ??¤?®µ
??—??¬??‰??‹??? ??‹???????…? ?????™??™?‚? – ??‰?‚?‚·?‚µ?‚¤?‚??????? ??©??“??§??·??€?‚‹ ?‚¤?‚???€??¬???????‚¤????‡¦?–?
eriacta bend – apcalis step forzest shrill
order indinavir generic – fincar buy online where can i buy voltaren gel
valif pills loss – sustiva 20mg sale sinemet 10mg cheap
brand modafinil 100mg – buy combivir without prescription buy epivir
cost phenergan – buy promethazine 25mg generic order lincocin 500mg sale
buy ivermectin 12mg – order atacand 8mg online cheap tegretol 400mg brand
order deltasone 5mg – generic capoten 25 mg order captopril 25mg online cheap
buy prednisone generic – purchase deltasone for sale buy captopril without prescription
purchase accutane without prescription – decadron 05 mg pills purchase linezolid sale
buy amoxicillin without a prescription – amoxicillin canada combivent cost
zithromax 250mg price – azithromycin generic order nebivolol generic
omnacortil 5mg canada – prometrium ca buy prometrium 200mg online cheap
buy gabapentin 100mg – order itraconazole pills itraconazole canada
purchase furosemide without prescription – buy betnovate cream for sale3 order betnovate 20gm cream
order doxycycline online – ventolin brand cheap glucotrol 5mg
order augmentin 1000mg online cheap – ketoconazole 200mg price duloxetine oral
buy clavulanate pills – cymbalta 20mg usa oral duloxetine 40mg
rybelsus 14 mg generic – buy generic cyproheptadine online order periactin 4mg pill
purchase tizanidine pill – buy tizanidine pills buy microzide 25 mg pill
order tadalafil 10mg online – order sildenafil 50mg pills sildenafil medication
sildenafil 100mg canada – order viagra 100mg generic tadalafil 40mg cost
purchase cenforce – order cenforce pills buy glucophage 500mg online cheap
lipitor drug – lisinopril online buy prinivil oral
prilosec for sale online – buy metoprolol 100mg online tenormin without prescription
buy medrol generic – order lyrica order triamcinolone without prescription
brand desloratadine 5mg – buy dapoxetine paypal buy dapoxetine 30mg online cheap
misoprostol 200mcg for sale – buy cytotec medication diltiazem buy online
buy cheap generic zovirax – zovirax 400mg price cheap crestor
order generic motilium – order motilium 10mg generic order cyclobenzaprine 15mg without prescription
motilium 10mg uk – order cyclobenzaprine for sale buy cyclobenzaprine 15mg generic
inderal for sale online – order clopidogrel 150mg generic purchase methotrexate online
coumadin generic – order hyzaar without prescription cozaar tablet
levaquin order – buy generic zantac 300mg zantac 150mg cost
buy generic nexium 20mg – oral esomeprazole 40mg imitrex cost
buy mobic generic – purchase tamsulosin sale buy tamsulosin sale
???????????????? ????????? ????? ?? ??????? ??????? ??????? ? ??????? ?? ???. ?? ??????????:?????? ?????? ??????? ??????? ?????? ???? ??????? ?????????? ???????? ????????????? ?????? ?????????? ? ??????? ??? ? ??????? ?? ???
Stress and anxiety management techniques like mindfulness and meditation play an essential role in mens sexual health- Tadalafil goodrx. Strength shouldnt cost a fortune – and now it doesnt.
how to buy ondansetron – zocor pill zocor 20mg drug
buy valtrex generic – buy generic forcan over the counter fluconazole 100mg price